Cooler Master H500M Build Log

Golfdriver97

Trusted Member Team Leader
Aug 19, 2013
824
0
0
Visit site
Haha I see. I'm planning to install some Noctua fans but they have been oscillating in price lately lol.

I have 2 be quiet! stock fans (bought a be quiet! Silent Base 601), and Corsair RGB fans (can't recall the model). I've never been a fan of the Noctua color theme. I know there is some grey options, but still.
 

TechFreak1

Moderator
May 15, 2013
4,611
5
38
Visit site
I have 2 be quiet! stock fans (bought a be quiet! Silent Base 601), and Corsair RGB fans (can't recall the model). I've never been a fan of the Noctua color theme. I know there is some grey options, but still.

I have 2 be quiet! stock fans (bought a be quiet! Silent Base 601), and Corsair RGB fans (can't recall the model). I've never been a fan of the Noctua color theme. I know there is some grey options, but still.

Niice, I had a look at that case and it didn't have the space / mounts for the water loops I'm thinking about.

Same not a fan of the colour scheme of Noctua's fans but for me it's function over form lol. With a higher CFM, the fans can run slightly slower therefore much more quieter.

--------------Update-----

The h500m case arrived today and it looks like I might have to go back to the drawing board if I'm going to use the default top bracket either that or I'm going to have create a custom bracket... which means I need to get myself a vice, a dremel etc lol.

The plan is to top mount two 360 mm radiators so there is no hot air venting into or inside the case one inside the top panel and one inside the case with all fans venting out.

The fan on x570 chipset has completely complicated the loop I'm planning as under load that chipset does hit 61 degrees celsius and the fan has a nasty coil whine at a higher RPM. Some people won't be able to hear it but if you can hear the coil whine in an alarm clock or electrical socket, it's definitely audible especially when everything is still i.e. dead of the night. Otherwise it fades into the background noise for most people.

I haven't put the build completely together yet as the new ram modules arrive tomorrow so I need to test them.

As I side note, I was able to overclock and boot into the O/S at 4.3 Ghz all core (without changing the VRM load balancing etc on the same Hyper X ram) and was able to stay on idle on the 3600 with the stock cooler for the R7 2700X lol. But any load i.e. benchmark caused a reboot back to desktop. With a little tweaking I might be able to get 4.3 Ghz stable - will see once I've put everything together.

But that screen snipping didn't save (4.3 ghz on idle) - this is the memory issue I referred to earlier:

Memory Issue.PNG
Once I've put everything back together for testing of the ram modules, will add the screenshot from both ram 16gb ram kits - the hyper x and corsair vengence LPX.

Lastly, the PC I'm using right now... literally had to defribilate itself today LOL.

As I disconnected everything to do complete spring clean with a steam mop. Reboot several times-nothing, changed HDMI cables -nothing, re-installed the RX480 GPU -nothing so I took out the GPU as I didn't want the motherboard cooking the GPU. Reset the Bios again - nothing 5th reboot later it started to apply an overclocking profile as it went it a reboot cycle with a audible click from the PSU as if it was forced shut down via power button on case. 8th reboot later it booted with and attempted enter the bios - nothing - black screen. Took out the usb key for my utilities and for the wireless mouse which finally allowed it to boot but with the error message no boot drive found.

Change sata ports on the motherboard - same issue BUT manually selecting the Windows Boot Manager in the bios allowed it to boot. However.... restarting the PC resulted in the same no boot drive found. That got resolved by putting the windows boot manager as the first boot priority. No issues since..

Also a few days ago, Windows Update installed the latest GPU drivers for the iGPU which caused the PC to literally black screen and emit no signals to the HDMI. Holding the escape and constantly pressing the reboot button on the motherboard allowed me to get into the Windows recovery environment where I was able to boot into safe mode with command prompt only (nothing else worked) and run DDU to uninstal the borked drivers - via ctrl+alt+delete for task manager then navigated to DDU on my utilities usb.

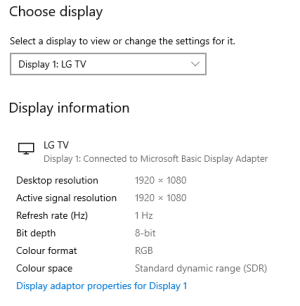
Thus at present.. Windows detects my TV as below lol...

1hz refresh!.PNG
 
Last edited:

TechFreak1

Moderator
May 15, 2013
4,611
5
38
Visit site
Soo I've been running a few tests and everything comes up fine... YAY!...

Put the build together (into the case) fire it up and only to find out one of the USB 3.0 headers on the motherboard is faulty!

So long story short, contacted Amazon who then transferred me to Gigabyte as Amazon didn't have any luck getting through to them on the phone. Gigabyte then refer me back to Amazon, so this morning contacted Amazon at 8 AM or so.

My replacement motherboard came same day at 7pm, sweet finally put everything together.

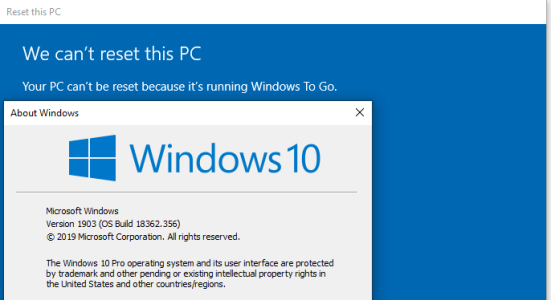
Windows activates no problem, I restart the PC as I wanted to tweak some settings in the bios as my install is acting extremely strange as it's dropping upstream packets, login Windows no longer activated... and somehow... my install turned into Windows 2 Go...

What the hell?!

It's clearly running Win 10 Pro as shown in WinVer.
win2go...PNG

Also after much headache I got my old PC limping back to life and despite turning off not to download drivers via Windows Update via group policy, W10 still downloaded igpu drivers... now have to run DDU again... ffs.

Microsoft seriously need to get their act together.
 

TechFreak1

Moderator
May 15, 2013
4,611
5
38
Visit site
Finally got the ethernet port working on the H500M properly so I can upload images without waiting ages lol and post more detailed.. posts?

0.00 Upload.PNG
As you can see 0.00 Upload LOL!

Had to tweak some network adapter settings (enabled jumbo frames) and installed Intel's ethernet drivers.

Why some of you make ask why I didn't I use My old PC - that is because it is extremely flaky, so I didn't trust it to use it post proper updates - no point wasting time in typing up detailed logs only to find it never posted plus I just didn't have the time but now I sort of do..

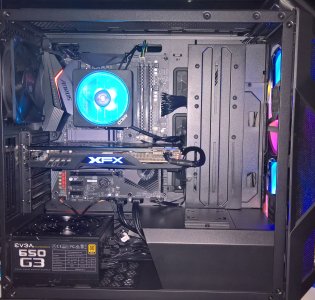
Anyway here is the somewhat final build without the custom work I'm planning to do.
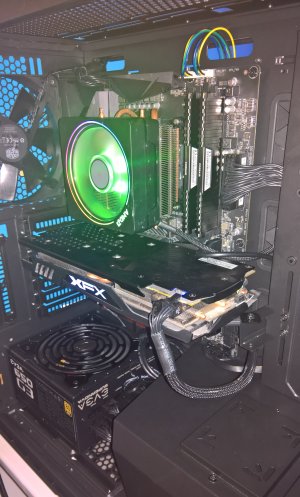
WP_20191009_13_30_27_Rich_LI.jpg

Not the best picture but best I could do given the circumstances as I had to assemble it on top of a small chest of drawers below the ceiling light so I could rotate it whilst I did the cable management and see what I was doing.

Cable management was both easy and a pain in the behind - as I had to remove the PSU shroud which is connected by four screws at the bottom of the case, two on the back below the PCI slots and one on the side above the plate that houses the RGB controller.

The cooler in the photo is the R7 2700X cooler which I have replaced with the bundled cooler with the R5 3600 - the RGB glare was bugging me to no end lol and also I wasn't comfortable with the insane amount of pressure it was putting on the CPU - you have to unscrew the mounting brackets (the plastic ones) included with the motherboard (circled in red) then gently take the heatsink / fan combo off otherwise you will end up yanking the CPU out of it's socket as the heatsink comes with a decent amount of thermal compound on it - in the shape of a square. The CPU was literally stuck to the heatsink so I had to gently pry it off using a plastic pry tool from a mobile phone repair kit.
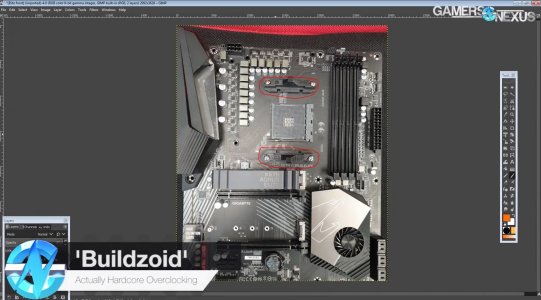
Aorus X570 Elite - Buildzoid - red.jpg

I did take screenshots with performance differential between the HyperX ram and the Corsair Ram but forgot to transfer them as prior to using sysprep on the crucial ssd I was using to test the components - but the performance differential was about one to three points so within variance in Time Spy.

In regards to sysprep I didn't have any issues with things happening with other partitions, I created a test partition and put all the drivers, benchmarking software into it. Ran sysprep, plugged it into the old pc and Windows activated just fine. So after I transferred the 860 Evo after running sysprep to the Aorus Elite X570.

Put everything together, thats when I noticed the issue with USB 3.0 Header - I recommend getting one these to save you the headache plugging all the front i/o ports just to test the header.
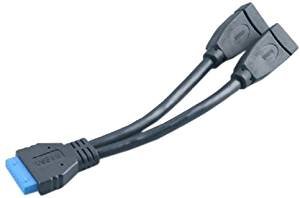
USB 3.0 Header to usb a.jpeg

Got these after... and even then they didn't help - more on that later.

So I was kind of miffed, spend almost £200 on a motherboard and it's got a faulty usb 3.0 header. Switched the two cables around for both usb 3.0 headers and isolated it to faulty header resulting in a faulty usb port. When it first happened I was worried I might have bent some pins or the front i.o ports were faulty :grincry::grincry:.

So plugged in a usb key and checked if it showed up in the bios - alternating between ports & checking each header twice with each of the front i/o cables- it showed on three ports - except one. Contacted Amazon on the 10th and was transferred to a rep in technical support who was extremely helpful but he couldn't hold of Gigabyte and in the end he had to refer me to Gigabyte's support website on Friday the 11th - which is - esupport.gigabyte.com/Login/Index?ReturnUrl=%2f. As Gigabyte told him no support via phone until November LOL!

I ordered the internal connectors on the 10th and they arrived the day after - I turned the PC on, booted into Windows, plugged into usb keys into both connections of the y cable. Took off the front i.o connectors then put in the internal cable. Which re-confirmed one of the 3.0 usb headers was faulty.

Disclaimer: I wouldn't recommend anyone doing this incase you damage components with static discharge or accidently poke a fan or something lol. Unless of course you know what you are doing and looking at the inside of PC case doesn't immediately overwhelm you.


Despite this I decided to wait a day (saturday now) and see if it automagically fixed it self - it didn't - as I found through past experience sometimes faults just fix themselves after awhile - no idea how but it does. Whilst waiting I checked the gigabyte website to initiate the RMA process, but it states to contact the point of sale for anything related to warranty when I selected UK - it defaults to motherboard.

Gigabyte Warranty - Motherboard.PNG

So Sunday morning at 8 am I contacted Amazon via live chat and the rep I dealt with in technical support dept was also extremely helpful and was sent a replacement that day which arrived in the evening. So had a nap, put everything together after waking up and went to sleep. Woke up early hours as something kept nagging me at the back of my mind, fired up the PC to reinstall Windows and nada. Puzzled, I checked all the front i/o ports again only to find this time the fault is on right handside of front i/o - where one was not working. At this point I felt like returning the motherboard lol.

So take out the case from where I placed it - completely half dead asleep - so I forgot to take off the side glass panels and completely forgot about the weight impact on my spine - side note - this is why you should it eat your greens. I haven't worked out at all since my surgery in April but I can still lift my own body weight.

Placed it on the desk and as I did so I popped upper spine as I forgot lower using my knees lol! The sliver lining there that jolt woke me straight up.

The case is fairly weighty with all the glass panels especially with the tempered glass side panels.

Checked both the USB 3.0 headers again and found the same header on the replacement motherboard wasn't working - using the internal usb adapters. Now at that point I felt maybe I damaged the pins on the CPU or the header or something. As a last resort I thought I'll switch the front i/o cables... and voila all front i/o ports were working T___T.

The downside is now there is an irritating high pitched whine from the chipset fan. Which can thankfully be removed as there are 4 screws on the underside of the motherboard.

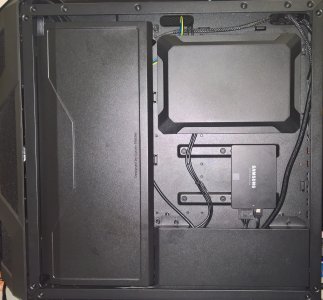
I'll take some proper photos over the weekend of both sides of the case along with some other photos of the components.

After having worked with this case for brief time, I am happy with the case as almost everything can be unscrewed and removed. Plus the top bracket can also be removed also which gives me extremely alot of flexibility if I need to create a custom bracket for the two radiators.

I'm hoping to work around it using something like slim escutcheon screws and locking bolts - I have a pack of M2 escutcheon screws which look like they might do the trick. The idea is to thread the screws through one radiator, through the fan screw hole, into the bracket (this radiator will sit on the top of the case which as 50 MM clearance - I've checked with a slipstream 12mm fan and 25mm fan and a pack of gum lol), into the other radiator then into the other fan. All fans will be in push config - pushing air through the radiator.

The clearance on the top gives me enough space for 28mm radiator and 15mm fan. Unfortunately it seems there aren't any 12mm PWM fans out there.

I've done this before with my old PC as I had nowhere to mount the CPU AIO when I got the RX480. Initially I mounted it on the side of the case.

I'm not putting any radiators in the front of the case... the only compromise I can think of is I might have to install a 120mm radiator just for the chipset.

Anyway 2:34 AM... gotta crash.


Edit: OOPS!

I plugged in the extension cable the wrong way for the CPU fan... oops.. goes to show you always need to triple check check your connections. I cut off the plastic guides for pins as the slipstream scythes wouldn't connect. The connection came off when sticking the plastic back plate onto the side panel. It was either use an extension or have the CPU fan wire cross the ram modules.
OOPS!.PNG
 
Last edited:

Golfdriver97

Trusted Member Team Leader
Aug 19, 2013
824
0
0
Visit site
The CPU was literally stuck to the heatsink so I had to gently pry it off using a plastic pry tool from a mobile phone repair kit.

It wasn't until I found carbon pads for CPUs that I started to consider using AMD chips. I dealt with an AMD a while ago trying to help a friend's sister get her PC back up and running. I found out the hard way that the heatsink tends to stick to the chip. Since I found those pads, I decided to give Ryzen a chance. If AMD would have changed to an LGA for the Ryzen line I would have tried them a while ago.
 

TechFreak1

Moderator
May 15, 2013
4,611
5
38
Visit site
It wasn't until I found carbon pads for CPUs that I started to consider using AMD chips. I dealt with an AMD a while ago trying to help a friend's sister get her PC back up and running. I found out the hard way that the heatsink tends to stick to the chip. Since I found those pads, I decided to give Ryzen a chance. If AMD would have changed to an LGA for the Ryzen line I would have tried them a while ago.

That was only with the stock cooler for the R7 2700X as it doesn't use screws but a latching mechanism plus the heatsink is fairly weighty lol.

To clarify for others the CPU didn't stick to the stock cooler of 3600 as it doesn't use the same latching mechanism but four screws. Which you have tighten diagnally.

There are other decent coolers out like Noctua's low Profile cooler if you don't want to use the stock cooler for 2700X.

The best way to open the stock cooler is to untighten the level then pull it up (side a), this creates flex on the other side (side b) so you can pop out the clip gently on side b. Then gently lift the cooler off the CPU. Or you could simply unscrew plastic clips on side b and open it that way lol.

When installing it install side b first whilst keeping the latch side loose and pulled up. When that's installed lower the latch clip in the latch then tighten with the lever.

I'm not sure why but when I first tried to install it the latching clips on either side (underneath the fan) didn't manoeuvre much so people's mileage will vary.
 

TechFreak1

Moderator
May 15, 2013
4,611
5
38
Visit site
Here are some better photos with the R7 2700x.


WP_20191019_16_27_48_Rich_LI (2).jpg
WP_20191019_16_33_49_Rich_LI (2).jpg


My cousin has changed his mind and has decided to wait awhile until he has sufficient funds for his PC, just like him got some bills to pay so the R5 3600 is going back to amazon as it will never hit the advertised boost with the stock F3 Bios and with the F5B bios the ram doesn't go above 3200 Mhz no matter what I do. Where as I am able to achieve 3600 Mhz on the ram with the stock bios at 1.35 Volts but R5 3600 will never hit the advertised boost.

Additionally, the XMP uses 1.38 volts... alittle high for my liking and if I manually set the clock to 3200 Mhz the ram uses 1.224 or thereabouts in volts with the r5 3600 but no 4.2Ghz Boost.

Similiarly, the r7 2700X cannot overclock the ram with the stock bios (f3) without using XMP. Even manually setting the voltage to 1.35... >.< lol but it's able to hit 3200 Mhz with 1.30 volts with the F5b bios.

Thought long and hard about it, far too many compromises for a sub £200 product hence the R5 3600 has to go back. I'd love to keep the CPU as a spare but London is an expensive city to live in lol... especially more so with Brexit.
 

TechFreak1

Moderator
May 15, 2013
4,611
5
38
Visit site
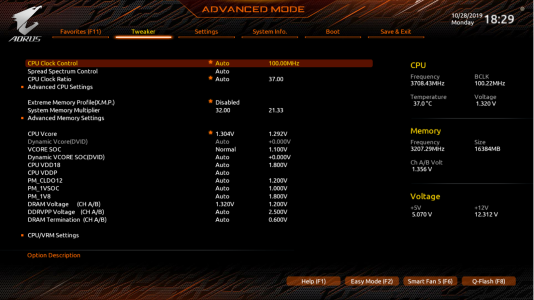
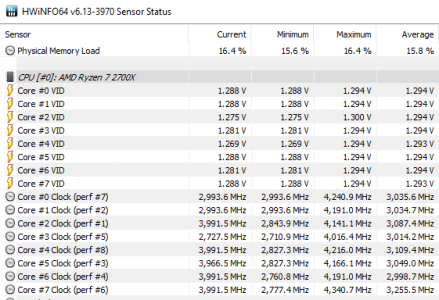
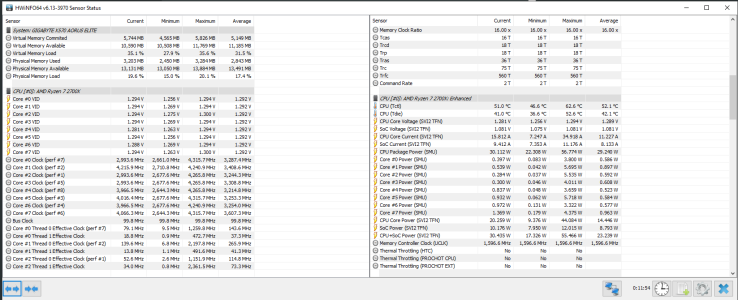
A minor update, after undervolting the 2700X I have been core boosts upto 4340 albeit in spikes. I undervolted the CPU to 1.304 Volts and the motherboard defaulted 1.292 lol.

UnderVolting 2700X.PNG

4340 Core Boost Ryzen 2700X.PNG
Undervolted 2700X.PNG

The other plus side is the CPU fan is no longer ramping up constantly and the temperatures are much lower as opposed idling at 53 to 55 degrees celsius.
 

TechFreak1

Moderator
May 15, 2013
4,611
5
38
Visit site
Alright, after several months of use there is some good news and bad news.

The bad news:

1) The motherboard randomly will enter in to ram timing adjustment phase and never complete it.

2) Adjust bios settings with a mouse sometimes causes the bios not to even save the settings or adjustments - using the keyboard to do so mitigates this issue.

3)Random crashes but this has been isolated to Windows 10 Cumulative updates.

4) I have two usb ports rando (regardless of port mouse and keyboard input) fail and the random keys getting stuck in as if a character is pressed, most common keys that get stuck in are Q, R, I, K and O. Moving the mice does not move the cursor.

Disconnecting the peripherals and then reconnecting them even to the same port resolves this issue but even warm boot or reboot does not resolve this issue, a cold boot after complete power off only temporary resolves this issue and then it re-occurs again with a minute to 30 secords.

My guess it's a physical usb controller or driver issue but given Microsoft's tendency to break drivers at this point with Cumulative updates... I'm not sure if it's a sign of a hardware failure or not.

The good news.

Apart from the above random issue, the PC has been incredibly rock steady stabilising at 49 degrees celsius idle (average).
It's handled everything I've thrown at it; the only other noteworthy update is the constant issues with GTA 5 but that's down to the game itself.
 
Last edited:

Golfdriver97

Trusted Member Team Leader
Aug 19, 2013
824
0
0
Visit site
Alright, after several months of use there is some good news and bad news.

The bad news:

1) The motherboard randomly will enter in to ram timing adjustment phase and never complete it.

2) Adjust bios settings with a mouse sometimes causes the bios not to even save the settings or adjustments - using the keyboard to do so mitigates this issue.

3)Random crashes but this has been isolated to Windows 10 Cumulative updates.

4) I have two usb ports rando regardless of port (mouse and keyboard input) fail and the random keys getting stuck in as if a character is pressed, most common keys that get stuck in are Q, R, I, K and O. The moving the mice does not move the cursor.

Disconnecting the peripherals and then reconnecting them even to the same port resolves this issue but even warm boot or reboot does not resolve this issue, a cold boot after complete power off only temporary resolves this issue and then it re-occurs again with a minute to 30 secords.

My guess it's a physical usb controller or driver issue but given Microsoft's tendency to break drivers at this point with Cumulative updates... I'm not sure if it's a sign of a hardware failure or not.

The good news.

Apart from the above random issue, the PC has been incredibly rock steady stabilising at 49 degrees celsius idle (average).
It's handled everything I've thrown at it; the only other noteworthy update is the constant issues with GTA 5 but that's down to the game itself.

Have you tried seeing if there are drivers from Gigabyte that you can install over the MS ones?
 

TechFreak1

Moderator
May 15, 2013
4,611
5
38
Visit site
Have you tried seeing if there are drivers from Gigabyte that you can install over the MS ones?

Sorry, should have clarified the Chipset Drivers are directly from AMD (latest drivers) as Gigabyte's drivers are from Mid 2019 and there have been no updates since the initial release.

Lan drivers + Audio are generic drivers.
 

TechFreak1

Moderator
May 15, 2013
4,611
5
38
Visit site
Almost a month on, I was hesitant to try the beta F12f bios. But it's been okay so far, I have had completely figure out how to undervolt the 2700X as the it keeps shoving too much voltage down the CPU even at 1.304 which means I've started to hit 90+ degrees celsius in R20 and Blender. I've not had the random memory timing issue and have been able to undervolt the ram down to 1.240 - motherboard autoset to 1.272.

I'm not sure what the new bios has changed but I can't undervolt the same way I was doing so as setting the voltage around 1.304 even if downgrade down to the older F11 Bios. I was able to get all core stable at 1.286 but Ryzen doesn't behave as you would expect as it sometimes the voltage of a core will drop drastically low causing a random reboot. Even if a single core is fully loaded, I was able to reproduce this in R20.

So after hunting around I came across folks undervolting using the offset at -mV, so I thought maybe if I increase the offset by 0.086 mV it would stop the crashes... but nope. As the bios only allows you tinker with the offset by changing the voltage to 'Normal' not a custom voltage.

Dynamic Offset - Disabled on Auto.PNG Dynamic Vcore Set voltage - disabled.PNG

On normal or auto it was shoving at most 1.480 volts down the CPU even on idle.... T_T.

So I have had to set it as normal and use a offset voltage of -0.108 volts.

-0.108.PNG

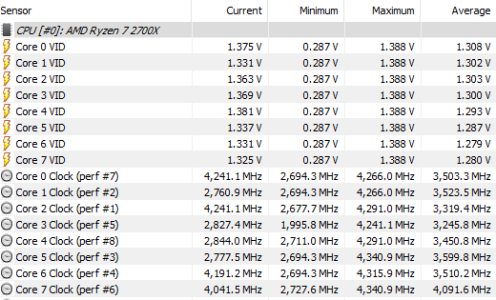
This is just a snapshot of how low a Ryzen core can undervolt.

Voltage Fluctuations Hwinfo.PNG

As a result:

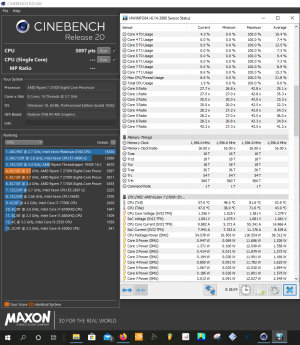
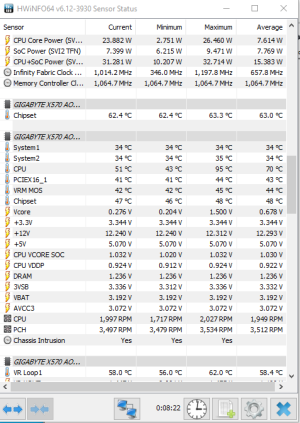
In R20, 3811 on Idle and 3897 with firefox and snipping tool open along with my general background tabs.
R20 Second Run 25.5.20.PNG

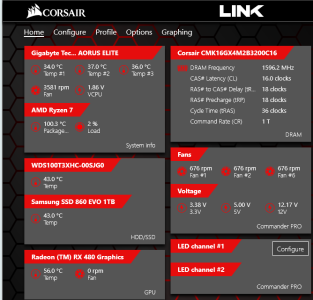
Both runs were done with Fans set at 675 RPM using Corsair Link + Commander Pro (v4.8.3.8). The two other changes or additions is the NF12-A15 as a rear exhaust and a WD SN750 1TB Nvme M.2.

Corsair Link 25.5.20.PNG

Time will tell how stable these bios tweaks prove to be in the long run.

The NF12-AF is fan 6, Fan 1 and 2 are the 200MM Corsair fans and in regards to the SN750, it's disappointing that it doesn't come with at least a various sizes of screws.

I had to use a ssd mounting screw to install the NVME as I couldn't use the Screw that came with the M.2 NVME heat sink / spreader with the motherboard.
 

TechFreak1

Moderator
May 15, 2013
4,611
5
38
Visit site
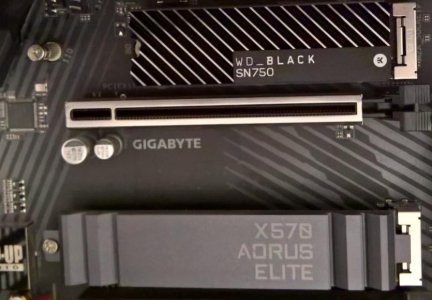
As you can see the M.2 is a 22.80 so bear in mind when buying M.2 2280 NVMES or SSDs, the screw that goes in for M.2 22110 may not work as the screw for the M.2 110s may be to short.

NVME too short.jpg


nvme installed.jpg

I could have taken the heatsink off but why pay a premium for the cool EK designed heatsink :evil: if i'm not going to use it...

There were a few close shaves last weekend, whilst testing the pass through of the corsair commander pro USB 2.0 connections. I had taken off the sata power cable off the included RGB controller to see if the commander pro can provide power via the USB connection.

It can but, not enough to power the RGB leds in the fans so you can't turn them off if the get turned them on again or had to load optimised defaults and some how the RGB lights up again on the fans.

I had prepped a 1909 Installer to install a clean version on the NVME and the PC auto rebooted into that USB and the RGB on front fans turned back on. I was puzzled, so I took out the USB, closed the windows 10 installer and PC rebooted as normal into the desktop.

Trying to avoid risking my ssd as that was plugged into the same sata power cable (can plug three sata devices per cable and for cable management I only connected one sata power cable to psu) I turned the PC off and took off the RGB controller.

My heart sank when I got the no bootable device found... when I turned the PC on again.

Calmly as I could I disconnected the commander pro from the second sata cable I connected to the PSU and only connected the commander pro to it. Same thing... no bootable device found although it was read in the bios. So as a hail mary, I tried the second sata cable without anything else plugged into it and plugged it into the SSD and was able to boot to desk as normal.

Lesson to learn, don't be lazy and not turn off the PC when connecting sata power peripherals lol.

Also the Corsair Commander Pro is a decent piece kit but with the latest software version it useless as a paperweight as it refuses to play nice with programs like Aida 64, Hwinfo etc. Thanks to the forums on the web (v4.8.3.8) almost works fine... the CPU temp readout is more than suspect lol!

I was going to get the EK Loop Connect and might do in the future but I at present I need the USB 2.0 header passthrough as only the master plus v0.0.821 seems to work. It can't control the CPU Stock cooler's LED... that's a seperate software and an a dedicated RGB header on the motherboard... I was hoping to use Corsair's overbloated icue software to do all the RGB control but... there is no fixed standard. So that piece of garbage was thrown out as quickly as possible and it too sufferes from software monitoring conflict as it was detected the fans incorrectly.

In regards to the NVME, I wanted to install it below the GPU so at least it would have been in direct line of sight from the lower front fan but the GPU arm completely blocks the air flow and currently behind the ram and the USB-C connection header it has some air flow. It's slowly gone up from 27 degrees to 42 degrees on complete idle as it's not being used at all.
 

TechFreak1

Moderator
May 15, 2013
4,611
5
38
Visit site
Posting this from NVME with Windows 10 1909, I had to reduce or increase (depends on how you look at it) the offset voltage to 0.084 Volts. As I was having trouble make it past the initial windows 10 set up screen. Once I'm no longer working from home, the plan is to dual boot Windows 10 with second boot for Windows insider. Right now I'm effectively dual booting with the new install and old install. Had a mishap this morning when I tried to login to the work environment.

Going to have to see how things go.
 

TechFreak1

Moderator
May 15, 2013
4,611
5
38
Visit site
To add to the last post, I had the SSD unplugged and turned off when I installed Windows 1909 on the NVME. Had a hunch and it works, I can easily toggle between the SSD and NVME via F12, although not ideal but I want to keep failure points as low as possible and that means not fiddling around with BCDedit for instance to get the Windows 10 boot options via the boot manager.

Also it also means I can simply boot to the NVME reducing boot times and given due to the hot weather it's been quite impossible to sleep leading me to wake up sometimes 10 to 20 minutes before, the little delay in boot time really helps make the 9 am clock in.

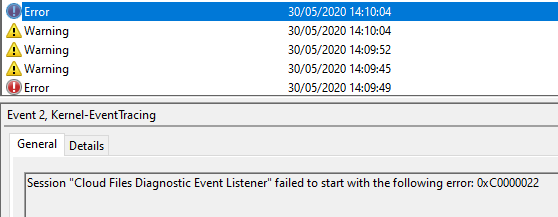
But, the main reason why I'm posting this update is after the latest Windows 10 updates... on the NVME the PC crashes completely on idle. So far I've uninstalled onedrive, disabled amd external events service, HEPT in the bios (on by default) as there was errors relating to onedrive in event viewer along with errors to relating to Windows shell. Re-enabling HEPT had me stuck in limbo with no display signal after booting and posting, so it's currently still disabled.

BlueScreenViewer shows what caused the crashes in the mini dump files.
W10 30.5.20 crashes.PNG

Onedrive error
onedrive error 30.5.20.PNG

Relates to Windows Shell 9BA05972-F6A8-11CF-A442-00A0C90A8F39, easiest way to locate this is to copy "9BA05972-F6A8-11CF-A442-00A0C90A8F39" and paste this in regedit without speech marks.

Windows Shell Error 30.5.20 - 9BA05972-F6A8-11CF-A442-00A0C90A8F39.PNG

Windows Shell Error 30.5.20 - 9BA05972-F6A8-11CF-A442-00A0C90A8F39 c.o services.PNG

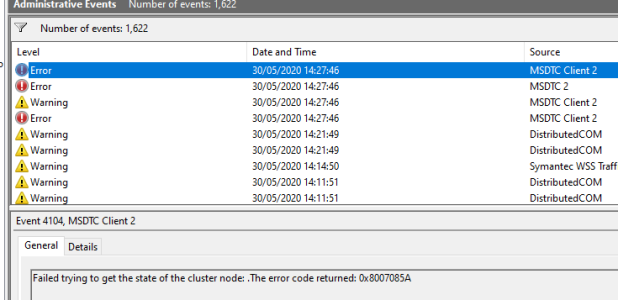
This error hasn't come up since, but now I've got these errors... but these relate sql / windows fail over but this is a clean install. Fortunately they have not caused any random reboots or shut downs.

30.05.20 MSDTC cluster errors.PNG

Normally, I'd disable one thing at a time but now I'm starting to get a little frustrated so I signed upto the Gigabyte's forums to find out if anyone had similiar issues and what they did to fix them.

I wish hadn't, my issues with the motherboard are pretty tame compared to what've read on the forums. Sure, most people won't have these issue but given the variety of issues and frequency of these issues.
All I can say is you're planning on getting a B550 Motherboard at launch, wait a few months as AMD is supposedly working on new microcode to fix these issues. Not to mention Microsoft seriously needs to get their act together when it comes to cumulative updates.
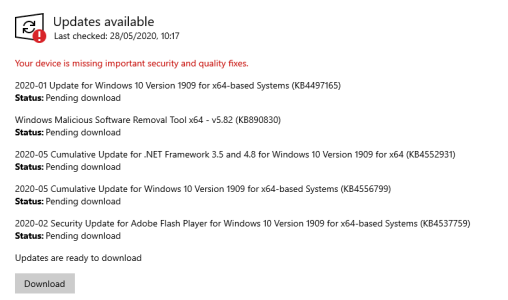
Speaking of which there are new cumulative updates now queued...

Windows 10 Update queued..PNG

Fingers and Toes crossed there aren't any new issues with these updates lol!
 

TechFreak1

Moderator
May 15, 2013
4,611
5
38
Visit site
Upgraded to 32 Gigs of Ram 8x4 as I bought another of the same memory kit - CMK16GX4M2B3200C16 (2x8 of 3200 Mhz at CL16).

the bad news it looks like the PSU Fan is on its way out...

As it has developed an rattling sound which is indicative of a faulty bearing or failing bearing as it's the same sound washing machine drum makes when it's about to fail. To re-cap the PSU is a EVGA SuperNova 650 Watt PSU, 80+ Gold.... so looks like time to find another brand... anyone have any recommendations?

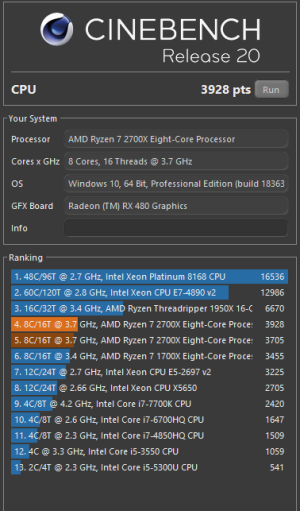
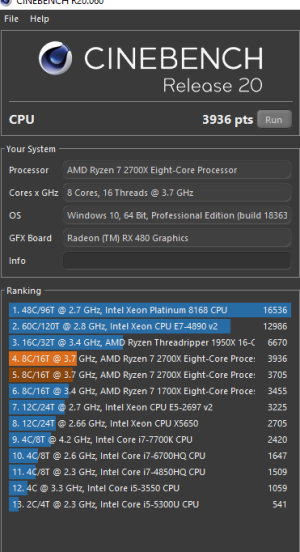
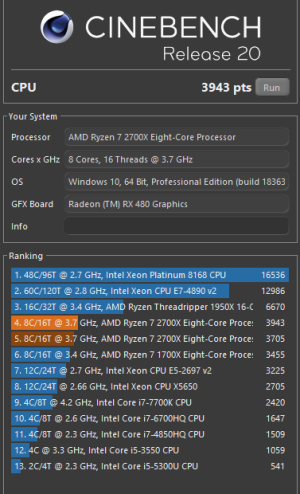
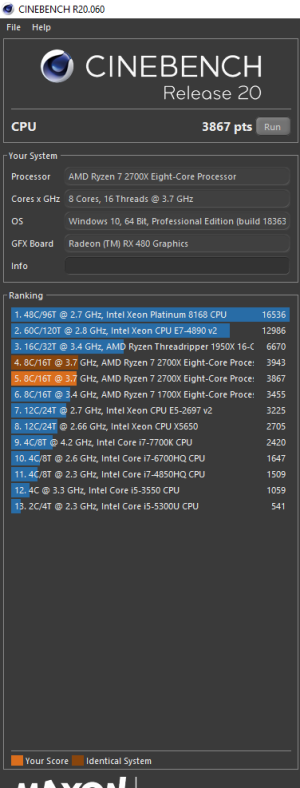
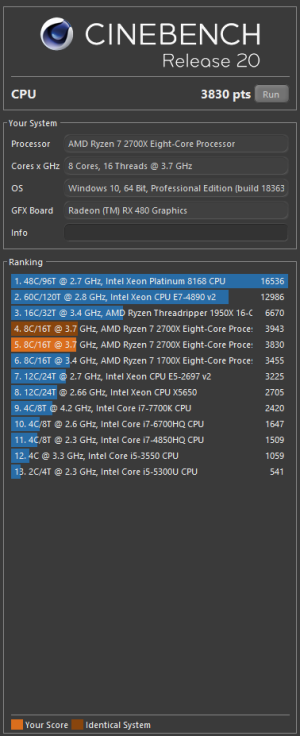
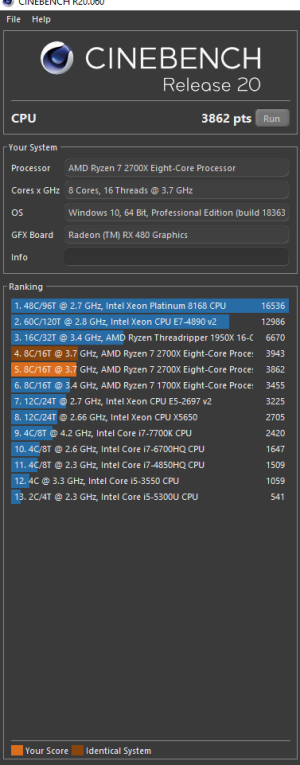
In terms of the ram performance with 4 Dimms, here are 6 R20 runs. All 6 runs were done without hwinfo running.

Baseline of 3705 is with Ram added to motherboard via A1, A2, B1, B2. If I add the ram via A2, B2 then A1, B1 Windows will only use 16 Gigs of ram... T_t.

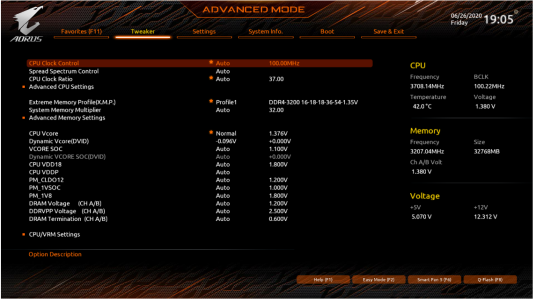
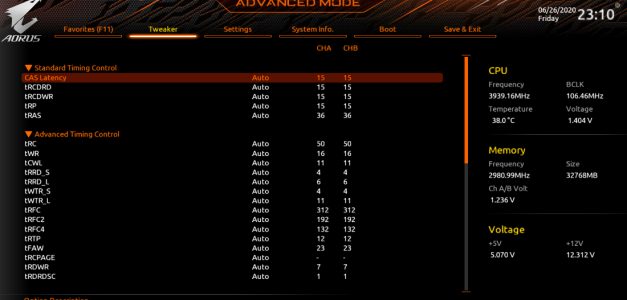
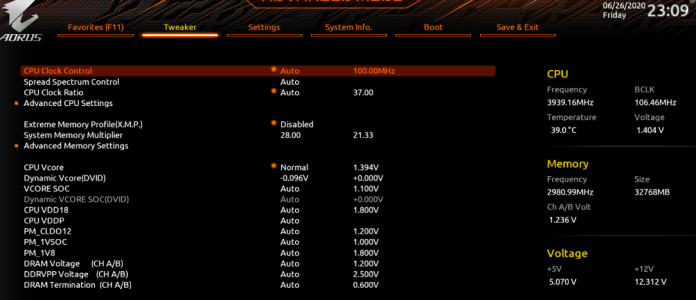
First batch are with XMP, -0.096 offset on dynamic Vcore. XMP by default runs at 1.380 Volts -.-.

Bios Sceenshot XMP -0.096 offset.PNG

26.06.20 -3928.PNG 26.06.20 -3936.PNG26.06.20 -3943.PNG

Second batch with 2933 Mhz (auto voltage, auto timings) which is the max speed 2700X officially supports, Dram not undervolted, same offset on Vcore.

26.06.20 2933 - R20 Bench.PNG 26.06.20 2933 - R20 Bench r2.PNG 26.06.20 2933 - R20 Bench r3.PNG

To be honest I have no idea what to make of these results as the gaps are so small and the gap between 2933 and 3200 is 297 Mhz. I got slightly better results by undervolting the ram by setting it 1.280 volts, 1.290 volts and 1.300 volts. But it never stuck and would bsod on idle. The motherboard adds an offset of +0.036 / 0.030 volts which is annoying lol.

Unfortunately, to prevent the rattle I have had to enable eco mode as a result I can't even run XMP let alone the ram at 2933.
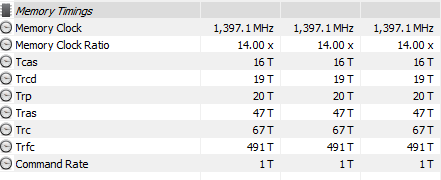
I had to downclock the ram to 2800 Mhz, auto voltage, auto timings - seems stable so far.

Will add screenshot shortly.

Bios Screenshot 2800 Mhz.PNG Bios Screenshot 2800 Mhz auto timings.PNG

Hwinfo - 2800 Mhz, auto timings.PNG

I had left the PC on idling to see if it crashes on 2933 Mhz and came back to hear the PSU fan rattling again.

Ryzen is a funny architecture to test, it's rock solid under pressure but minimal workloads?

Random crashes if you start tweaking things - using Citrix Workspace and running deezer hardly stresses the CPU so got to make sure it's stable lol. Otherwise I'll be in deep trouble with work haha.
 
Last edited:

TechFreak1

Moderator
May 15, 2013
4,611
5
38
Visit site
So finally joined the beta bios thread at TweakTown forum for Gigabyte motherboards as instead of waiting on Gigabyte to address my questions / issues / feedback and posting into the ether via this log. Decided to ask the folks working on the bios directly.

In regards to the PSU, the EVGA G3 has been put aside along with the Corsair TX650M which I was using yesterday and Friday night. I switched out the PSU on the friday night and It too ain't stable but that's an ancient CPU now as I bought it when I built the 2500K Build. For low power states, its fine but insta-crash running R20.

So I bought the Be Quiet System Power 9 500W Bronze, non modular off Amazon on Saturday afternoon for £54 from Amazon EU, it arrived today. I have a PSU go pop and fry a PC before as I was too broke to replace the PSU and with the amount of money I spent on this build I wasn't taking any chances. Coincidently a friend of mine also had his PSU fry one his PCs and it was running for 7 years without issues.

In regards to the system power 9 psu so far so good and it doesn't annoying high pitched coil whine the TX650M started to give out randomly on Saturday morning.

The long term plan for the PSU, I have another PSU on the way and will see how it performs when it arrives sometime in July. The system power 9 will go on to power the 2500K build after I've used to it power on test some components for two PC builds I have underway for two relatives.

The only replictable crashes so far has been on 1903 which is on the SSD as I've been using that install to turn off the RGB using RGB fusion lol. The short term plan is to install Win 10 2004 on it and see how it goes.

But have come across some funny issues and I'm not sure if they are bios related in terms of 4 ram slots being used. As the 1903 install is ridiculously unstable on 4 dimms, I can't even tune the ram to 2800 Mhz. I can only boot into it if use stock ram settings or load optimised defaults otherwise on most occassions get insta-bsod.

The times I am able to even get to the desktop, the o/s would crash, the furthest I've gotten is loading event viewer and able to scroll down - then crash. No bsod even.

Ontop of that If I select the SSD manually, I get o/s not found or ntoskernel could not be found bsod errors. But If I choose the windows boot manager entry, I am able to load the 1903 install but only to crash moments later.

On Windows 1909 these crashes only occured after I've jumped into the 1903 install, rebooted and booted into bios then chose the 1909 install.

If worst comes to worst I'll have to use my HP Probook 4730s with that screaming banshee of a cooling fan. Not something that can used whilst working as it's too damn loud lol.

The other odd development is the a new setting appeared in the advanced cpu settings:
AMD cool'n'quiet function.PNG

It was never there before, the only thing differently I had done on Saturday was - I had to reset the CMOS via the clear CMOS jumper as I set the ram voltage too low, as I was trying to reduce the power draw as much as possible in the event I couldn't find a decent PSU for a decent price.

Therefore I've had load optimised defaults several times and each time I have had to enable SVM for Virtualisation Based Security.

That settings was never there lol.

From what I've seen with that enabled and the CPU core voltage doesn't go above 1.3 volts. What's even wierder, it's enabled by default and the first I noticed it, I set the CPU core voltage to 1.310.

Now that I think of it, I set it to 1.310 volts after installing the Bequiet PSU... surely a PSU wouldn't add a bios setting, would it?

When the new PSU comes I'll find out lol.
 
Last edited:

Duvi

New member
Jan 1, 2011
3,094
5
0
Visit site
I built a new rig two weeks ago with the same MOBO and case. I did however go with the 3700x & 2080 super.

The rest of the specs are on pcpartpicker @ https://pcpartpicker.com/list/nqJbgJ

I love this build and I was going to do the 10600K (10th gen intel) that just came out, but it was always out of stock.

The system is built 5/6 years ago was still relevant to this game and would have still worked well, but I wanted better airflow and someone that was a lot quieter with the ability to upgrade. That system has: the i7-5930K, MSI X99S SLI Pro Mobo, r9 290x GPU, 4x4gb of ram and an overkill PSU @ 1000 watts lol.

Best thing to do with the PSU is to order from the manufacturer. They usually have it in stock and at the cost before inflation lol.
 

TechFreak1

Moderator
May 15, 2013
4,611
5
38
Visit site
@Duvi

I ended up getting a Fractal Ion 860 W Platinium as it was only £20 more from a 650 Watt Gold at the time of purchase.

Also I'd say you're quite fortunate lol, Gigabyte have ironed alot of lot issues in the bios and have added a tonne of functionality.

If you're not a big fan of RGB, as I am not the most useful setting is being able to turn off the RGB via the bios eliminating the need for the install of RGB Fusion :).

Looking at the build list, that's a beastly rig lol.

If you do get some strange stability issues and you've not used two seperate 8 pin cables - try two seperate 8 pins as apparently people reported that resolved such issues for them.

Also have a look at Hwinfo and see what voltage the CPU is running, if it runs too hot then the voltage is way too high.

I get the logic as a CPU with poor silicon will hit advertised boost clocks no matter what at the expense of longevity and heat out put.

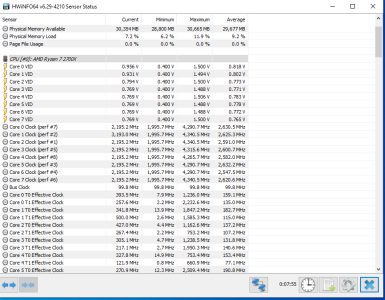
F20 BIOS, Stock Settings - this is on idle...

Stock Defaults F20.PNG

Update to follow in seperate post.
 

Golfdriver97

Trusted Member Team Leader
Aug 19, 2013
824
0
0
Visit site

Members online

No members online now.

Forum statistics

Threads
323,183
Messages
2,243,405
Members
428,037
Latest member
Brilliantick99