Hello fellow Lumia 950XL'ers,
I was unpleasantly surprised to find my Lumia 950XL was not initiating a charge from my Nokia Wireless Charging Car Holder. After a little tinkering, I found that I could trigger it if I got the phone a little lower on the plate.
However this is not a solution as it protrudes over the bottom bracket, barely stays in place and the inverse square law means I'd be getting a fraction of the charge power.
So, I came up with a plan to hack the stand so that it works for the new phone. I could move the coil inside the phone's cover, but I just bought the phone and will wait until I get a 3rd party cover (I'll come back here and post an update when I do this).
Here is a Vine of the final result
Tutorial: (WARNING: you will void your charger's warranty)
You'll need:
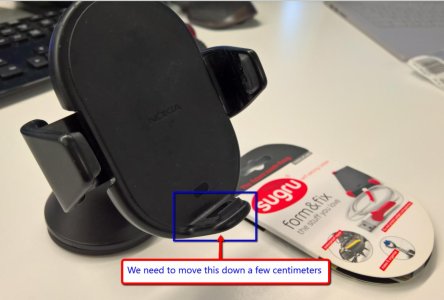
Before we get started, you should understand what we're going to do. The reason the charger doesn't work is because the phone's coils are too high for the charger. So we're going to lower the bracket at the bottom of the charger so that the phone sits lower.
Step One
Disassemble the charger. This is simply four Torx screws behind the base. When you're done, you can separate the charging plate from the mechanical base. Here is what you should see:
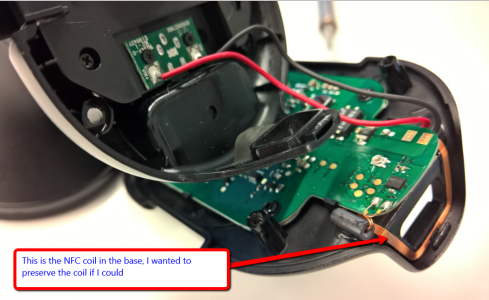
Here's what it looks like from the other side
Step Two
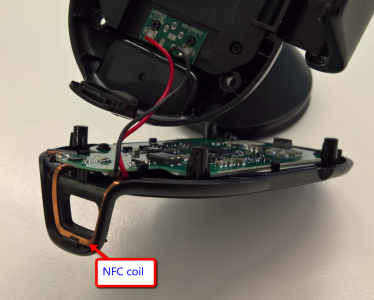
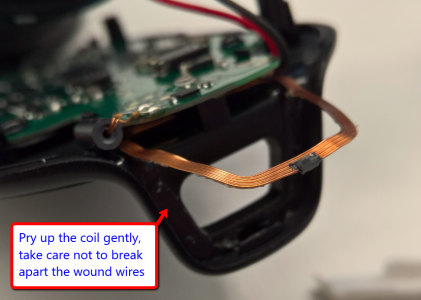
To preserve the NFC functionality of the charger, we need to gently left the coil away from the bracket. The coil is held down with a little rubbery glue. It's easily removed by wedging in something between the coil and the base. Do this all the way around the coil a little at a time so that you do not deform the coil.
Step Three
Now it's time to cut away the bracket from the two parts of the charger. The plastic is relatively soft and can be cut with precision with a pair of strong scissors. Cut across as close to the back/cover with strong individual strokes (I find the inner most part of the scissors provides the best leverage). Be careful not to cut the NFC coil.
You'll end up with this (important: hold on to the part that has "NFC" stamped on it. We'll be using that int he next step).
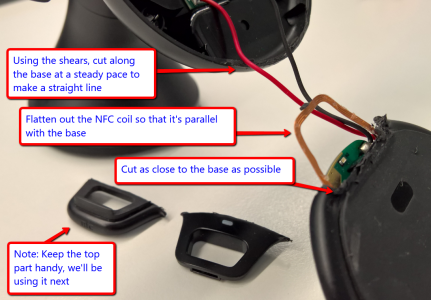
After the cuts, flatten out the NFC coil so that it's parallel to the base
Step Four
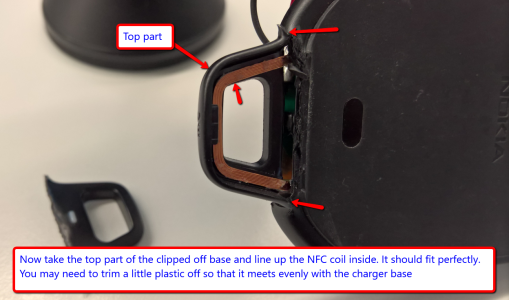
Now take the clipped off part that has the NFC stamp on it. Flip it over and line up the NFC coil inside it. You may need to trim off a little plastic if you didn't make a clean cut the first time. For me, this lined up perfectly without any tweaking. Gotta love symmetry in design!
Here's what it should look like, note how the coil is exposed to the front
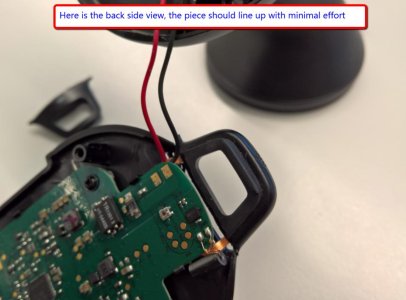
Here is what it looks like on the back side
Step Five
Now break out your Sugru rubber and knead it to a soft and warm consistency. You want to start filling in the space around the coil first so that you have a strong protective layer around the piece.
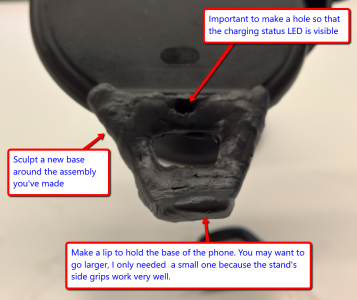
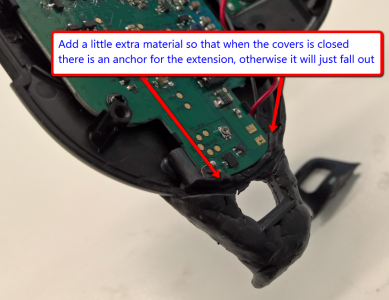
Next you can start extending the rubber into the base, this is important as you need to be anchored inside the charger after its reassembled, otherwise it will just fall out. You'll want to put a hole in the middle for the LED light, the LED is white-ish surface mount component. Make sure you're not covering it with any rubber.
Lastly, sculpt out a lip to hold the base of the phone. I didn't need a big one as I found my phone is held in place by the side grips and the bottom lip prevents it from slipping out as opposed to holding up the phone's weight.
Important Note: You may want to sculpt a larger lip depending on how you use your holder.
Here's what mine ended up like (excuuuse me for not being Michelangelo, lol )
And the back-side:
Conclusion
Now you'll want to reassemble the case BEFORE the rubber hardens, do a couple dry runs before screwing the cover back on. Check to make sure you're not extruding rubber and that the two power wires are not crimped.
Also, before the rubber dries, go and try it with your phone (be careful not to get rubber on your phone, this stuff is messy). Make sure the base lip isn't too high and that you're getting a charge
I hope this helps you, I'm sure as heck happy that my phone is charging again in my car without a thick USB cable protruding from the bottom of my charging stand
UPDATE:
I ended up adding a little bit of white rubber to the middle and slicing it down to a rectangular end. This allows the base to hold on to more weight. You'll find a photo of the final result here: https://twitter.com/lancewmccarthy/status/672765678840111104
Good luck!
Lance
I was unpleasantly surprised to find my Lumia 950XL was not initiating a charge from my Nokia Wireless Charging Car Holder. After a little tinkering, I found that I could trigger it if I got the phone a little lower on the plate.
However this is not a solution as it protrudes over the bottom bracket, barely stays in place and the inverse square law means I'd be getting a fraction of the charge power.
So, I came up with a plan to hack the stand so that it works for the new phone. I could move the coil inside the phone's cover, but I just bought the phone and will wait until I get a 3rd party cover (I'll come back here and post an update when I do this).
Here is a Vine of the final result
Tutorial: (WARNING: you will void your charger's warranty)
You'll need:
- Torx 8 wrench
- Strong pair of scissors (I used kitchen shears)
- Black Sugru self-setting rubber (or similar)
- Flat sculpting knife (a butter knife works fine)
Before we get started, you should understand what we're going to do. The reason the charger doesn't work is because the phone's coils are too high for the charger. So we're going to lower the bracket at the bottom of the charger so that the phone sits lower.

Step One
Disassemble the charger. This is simply four Torx screws behind the base. When you're done, you can separate the charging plate from the mechanical base. Here is what you should see:

Here's what it looks like from the other side

Step Two
To preserve the NFC functionality of the charger, we need to gently left the coil away from the bracket. The coil is held down with a little rubbery glue. It's easily removed by wedging in something between the coil and the base. Do this all the way around the coil a little at a time so that you do not deform the coil.

Step Three
Now it's time to cut away the bracket from the two parts of the charger. The plastic is relatively soft and can be cut with precision with a pair of strong scissors. Cut across as close to the back/cover with strong individual strokes (I find the inner most part of the scissors provides the best leverage). Be careful not to cut the NFC coil.
You'll end up with this (important: hold on to the part that has "NFC" stamped on it. We'll be using that int he next step).

After the cuts, flatten out the NFC coil so that it's parallel to the base
Step Four
Now take the clipped off part that has the NFC stamp on it. Flip it over and line up the NFC coil inside it. You may need to trim off a little plastic if you didn't make a clean cut the first time. For me, this lined up perfectly without any tweaking. Gotta love symmetry in design!
Here's what it should look like, note how the coil is exposed to the front

Here is what it looks like on the back side

Step Five
Now break out your Sugru rubber and knead it to a soft and warm consistency. You want to start filling in the space around the coil first so that you have a strong protective layer around the piece.
Next you can start extending the rubber into the base, this is important as you need to be anchored inside the charger after its reassembled, otherwise it will just fall out. You'll want to put a hole in the middle for the LED light, the LED is white-ish surface mount component. Make sure you're not covering it with any rubber.
Lastly, sculpt out a lip to hold the base of the phone. I didn't need a big one as I found my phone is held in place by the side grips and the bottom lip prevents it from slipping out as opposed to holding up the phone's weight.
Important Note: You may want to sculpt a larger lip depending on how you use your holder.
Here's what mine ended up like (excuuuse me for not being Michelangelo, lol )

And the back-side:

Conclusion
Now you'll want to reassemble the case BEFORE the rubber hardens, do a couple dry runs before screwing the cover back on. Check to make sure you're not extruding rubber and that the two power wires are not crimped.
Also, before the rubber dries, go and try it with your phone (be careful not to get rubber on your phone, this stuff is messy). Make sure the base lip isn't too high and that you're getting a charge
I hope this helps you, I'm sure as heck happy that my phone is charging again in my car without a thick USB cable protruding from the bottom of my charging stand
UPDATE:
I ended up adding a little bit of white rubber to the middle and slicing it down to a rectangular end. This allows the base to hold on to more weight. You'll find a photo of the final result here: https://twitter.com/lancewmccarthy/status/672765678840111104
Good luck!
Lance
Last edited:


