
Hi guys, let me skip the introduction.
Have you ever wonder how your "Pureview" Lumia stands in comparison with the new iPhone 5S (in term of photography), or what exactly is the Ultrapixel technology of the HTC One, or how your Lumia 1020 performs comparing with the legendary Pureview 808, or more, how smartphones today compete against each others and against compacts and DSLRs?
Well, here you won't see a shootout competition, instead we're going a little bit into technical details. Hope you're interested.
Camera specifications:
1. Aperture
Aperture is the hole within a lens, through which light travels into the camera. It's expressed like this: f/X (for example Lumia 1020 has f/2.2, Lumia 920 has f/2.0). The number represent the hole diameter. The smaller the X number, the higher the ability to collect light. So you'll want the X number to be as small as possible.
All the smartphone have fixed aperture, with a few exception (for example, the S4 Zoom has different apertures at different zoom levels)
Comparing the aperture: f/2.0 is larger than f/2.2 by (2.2/2.0)[SUP]2[/SUP]=1.21. It means f/2.0 let 21% more light in than f/2.2.
An image from wiki:

2. Sensor size
It's arguably the value representing the capability of a camera, and a lot more important than the "number of megapixels".
After the light gets through the aperture, it reaches the sensor. So the bigger the sensor, the more light can be gathered.
Most smartphones has very small sensors, of course with a few exceptions.
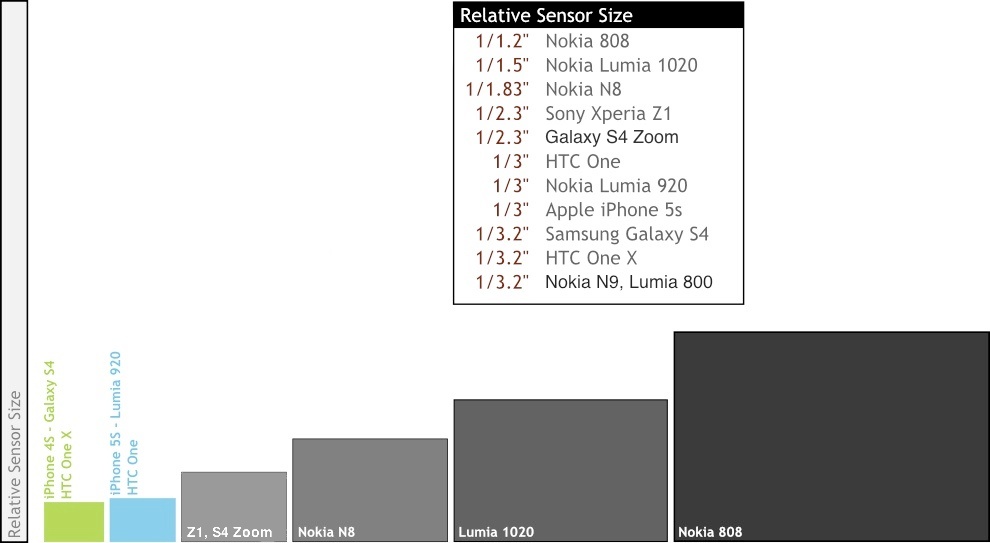
Sensor size comparison on Wikipedia
An image from Internet. You can see why 808 and 1020 rule smartphone photography world.
Another image to show the comparison with DSLRs.

3. Pixel count (the number of megapixels) (sensor resolution)
The sensor is divided into pixels. For example, we have 41 millions spots (pixels) on the sensor of 1020.
More MP doesn't mean better image quality (bigger sensor does). It just mean the images size will be larger, good for big prints. More MP also allows (digital) zooming and cropping.
Think of it like this:
- You have a very big image, you crop a part of it, and still have a big enough image. If you have less MP, you'll have a smaller image. If you crop a part of it, it might be too small, so you have to enlarge the image, thus reduce image quality.
- When you want to take 5MP image on a 41MP sensor, you can zoom in further than when you want to take 5MP image on a 20MP sensor.
4. Pixel size
The 808 has a bigger sensor than the 1020, but both have the same 41 millions pixels. So it means the pixel size of 808 should be bigger than 1020's.
The HTC One boasts its Ultrapixel technology, basically saying: "I don't need a lot of MP, I have big pixels", going in the opposite direction of the 1020.
Well, the benefit of having big pixel is:
Higher signal-to-noise ratio: The bigger the pixel, the more light photons it can captured. The more the photons captured, the higher the signal-to-noise ratio.
This is important in low light photography, where the light (basically the number of photon) is limited. For example, in low light situation, a small pixel captures very few number of photons, so signal-to-noise ratio is 1:1, while a bigger pixel can capture more photons, thus higher signal to noise ratio.
Bigger pixel also means high ISO used will produce less noise than smaller pixel (same concept as above).
But the bigger the pixel, the less pixels you can have (on the same sensor size). So there should be a balance between pixel size and pixel count.
To sum it up:
- Big aperture is good.
- Sensor size is the most important factor, because the bigger the sensor is, the more pixels and the bigger the pixel you can have (as sensor contains pixels).
- A lot of MP with too small pixels is not good: the 1020 trying to pack the same 41MP in a smaller sensor, pixel size is therefore reduced => More noise than the 808.
- Big pixels on a small, low resolution sensor is also not good: HTC One has only 4MP sensor, so no zoom, no crop, as images crack when zooming in and images size (dimensions) is small.
An overview:

Have you ever wonder how your "Pureview" Lumia stands in comparison with the new iPhone 5S (in term of photography), or what exactly is the Ultrapixel technology of the HTC One, or how your Lumia 1020 performs comparing with the legendary Pureview 808, or more, how smartphones today compete against each others and against compacts and DSLRs?
Well, here you won't see a shootout competition, instead we're going a little bit into technical details. Hope you're interested.
Camera specifications:
1. Aperture
Aperture is the hole within a lens, through which light travels into the camera. It's expressed like this: f/X (for example Lumia 1020 has f/2.2, Lumia 920 has f/2.0). The number represent the hole diameter. The smaller the X number, the higher the ability to collect light. So you'll want the X number to be as small as possible.
All the smartphone have fixed aperture, with a few exception (for example, the S4 Zoom has different apertures at different zoom levels)
Comparing the aperture: f/2.0 is larger than f/2.2 by (2.2/2.0)[SUP]2[/SUP]=1.21. It means f/2.0 let 21% more light in than f/2.2.
An image from wiki:
2. Sensor size
It's arguably the value representing the capability of a camera, and a lot more important than the "number of megapixels".
After the light gets through the aperture, it reaches the sensor. So the bigger the sensor, the more light can be gathered.
Most smartphones has very small sensors, of course with a few exceptions.
Sensor size comparison on Wikipedia
An image from Internet. You can see why 808 and 1020 rule smartphone photography world.
Another image to show the comparison with DSLRs.
3. Pixel count (the number of megapixels) (sensor resolution)
The sensor is divided into pixels. For example, we have 41 millions spots (pixels) on the sensor of 1020.
More MP doesn't mean better image quality (bigger sensor does). It just mean the images size will be larger, good for big prints. More MP also allows (digital) zooming and cropping.
Think of it like this:
- You have a very big image, you crop a part of it, and still have a big enough image. If you have less MP, you'll have a smaller image. If you crop a part of it, it might be too small, so you have to enlarge the image, thus reduce image quality.
- When you want to take 5MP image on a 41MP sensor, you can zoom in further than when you want to take 5MP image on a 20MP sensor.
4. Pixel size
The 808 has a bigger sensor than the 1020, but both have the same 41 millions pixels. So it means the pixel size of 808 should be bigger than 1020's.
The HTC One boasts its Ultrapixel technology, basically saying: "I don't need a lot of MP, I have big pixels", going in the opposite direction of the 1020.
Well, the benefit of having big pixel is:
Higher signal-to-noise ratio: The bigger the pixel, the more light photons it can captured. The more the photons captured, the higher the signal-to-noise ratio.
This is important in low light photography, where the light (basically the number of photon) is limited. For example, in low light situation, a small pixel captures very few number of photons, so signal-to-noise ratio is 1:1, while a bigger pixel can capture more photons, thus higher signal to noise ratio.
Bigger pixel also means high ISO used will produce less noise than smaller pixel (same concept as above).
But the bigger the pixel, the less pixels you can have (on the same sensor size). So there should be a balance between pixel size and pixel count.
To sum it up:
- Big aperture is good.
- Sensor size is the most important factor, because the bigger the sensor is, the more pixels and the bigger the pixel you can have (as sensor contains pixels).
- A lot of MP with too small pixels is not good: the 1020 trying to pack the same 41MP in a smaller sensor, pixel size is therefore reduced => More noise than the 808.
- Big pixels on a small, low resolution sensor is also not good: HTC One has only 4MP sensor, so no zoom, no crop, as images crack when zooming in and images size (dimensions) is small.
An overview:
Last edited:
")