- Feb 26, 2014
- 55
- 0
- 0
This 3-in-1 tutorial is meant to make people familiar with Windows 10, as well as allow testing your environment before upgrading your production machine.
All things explained here are not new, and are not "Windows 10 exclusive", but they're not very known.
For example, did you know you can boot Windows 7 in a physical machine from a virtual disk?
That's why I've decided to post this, both to make that information more public (once Windows Central is a good place for that), and also to make people able to test Windows 10 in a more realistic way, in order to determine whether those legacy applications (or even devices) will actually work on it.
With the Windows 10 release, I think it's the perfect time for such a guide.
Before starting, keep in mind you do it at your own risk.
I'll cover three things here, as follows:
1 - Convert a physical machine to a virtual hard disk
2 - Boot a physical machine from a virtual hard disk using VHD Native Boot
3 - Install Windows 10 to a USB drive and run it from there
While I will try to make it as short as I can (to avoid a boring reading), at the same time I won't omit important details.
Let's start:
1 - Convert a physical machine to a virtual hard disk
The idea behind this is you can clone your current physical machine to a Virtual Hard Disk file (VHD), thus being able to update the cloned machine to Windows 10, in order to test your apps and devices.By doing so, your real machine remains intact, and you can upgrade it later if your tests were successful.
Requirements:
Disk2vhd:
https://technet.microsoft.com/en-us/sysinternals/ee656415
Quick process:
Run Disk2vhd (it might ask for administrative privileges, and you should confirm it) from the machine where the hard disk you want to convert is in.
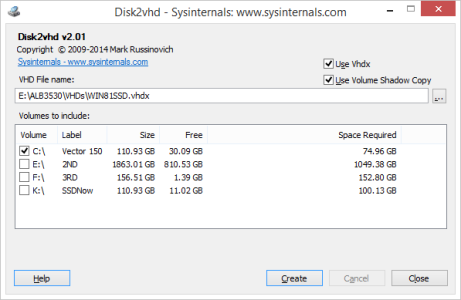
The process is very straightforward:
You mark the volumes you want to make a VHD from, choose a path in "VHD File name" for the destination disk, and press "Create".After the process completes, you'll have your disk(s) in a VHD form.
You can then start a machine from that disk, upgrade it to Windows 10, and test your apps, to see if all goes well.
Long details:
In order to make the resulting VHD bootable, when marking the volumes you want to convert to a VHD, you need to be aware the Windows partition (that one with Windows files and folders) and the boot partition (that one with the boot files) might be two separated partitions.
In that case, identify them in Disk2vhd, and make sure to mark both.
Disk2vhd has two options, marked by default.
"Use Volume Shadow Copy": It allows Windows' Volume Shadow Copy service to be used, what means you can convert the system disk (that's in use) to a VHD file.
"Use Vhdx": you can choose whether to use the newer Vhdx format, or the older vhd format.Basically, you only need to uncheck that option if both
you'll be booting a physical machine from the resulting VHD
and
Windows 7 is the main OS in the resulting VHD.
To short, only Windows 8 (and above) can be booted from a Vhdx in a physical machine. If you'll be upgrading to Windows 10 in a virtual machine, you can securely go for Vhdx, as it offers better performance and reliability than the Vhd format.
2 - Boot a physical machine from a virtual hard disk using VHD Native Boot
"VHD Native Boot" first appeared in Windows 7, and allows you to boot a physical machine from a virtual disk without having to touch in physical disk's partition layout.
You can use this technique to test your devices with Windows 10, once virtual machines can't access hardware devices directly.
Requirements:
A bootable VHD with Windows 7 or above;
A physical machine running Windows 7 or above;
Complete process:
Open the command prompt as administrator.
Type bcdedit and press enter.It should list the boot entries, like below:
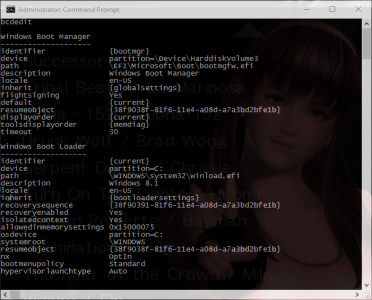
In my case, there's just one operating system, plus the Windows Boot Manager (that's loaded before any operating system)
Next, type:
bcdedit /copy {current} /d "Windows 10 Pro x64 Insider Preview"
This should duplicate the current operating system's boot entry.
In this example, I've used "Windows 10 Pro x64 Insider Preview" as the description, but you can write your own here.
The command should return something like:
"The entry was successfully copied to {38f90393-81f6-11e4-a08d-a7a3bd2bfe1b}."
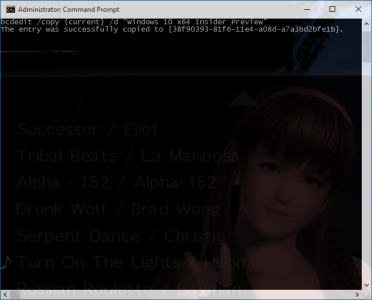
At that point, there should be one more operating system to choose from when starting the computer, called "Windows 10 Pro x64 Insider Preview".
Did you see that alpha-numeric sequence between curly braces?
Take note of that sequence, cause it's the identifier of new operating system you're adding to the boot entries.
You'll need it for the next 3 commands.
Note that "{38f90393-81f6-11e4-a08d-a7a3bd2bfe1b}" was generated randomly (better saying, according to my system), so you won't see that exact sequence in your machine.
In my case, it's {38f90393-81f6-11e4-a08d-a7a3bd2bfe1b}
Now, using File Explorer, locate the full path of the VHD file you want to boot from.
Let's suppose it's
K:\ALB3530\VHDs\WIN 10 TP x64.vhdx
Now, type the commands below, replacing {38f90393-81f6-11e4-a08d-a7a3bd2bfe1b} with the identifier you got.
Also, replace [K:]"\ALB3530\VHDs\WIN 10 TP x64.vhdx" with your VHD path.
bcdedit /set {38f90393-81f6-11e4-a08d-a7a3bd2bfe1b} device vhd=[K:]"\ALB3530\VHDs\WIN 10 TP x64.vhdx"
bcdedit /set {38f90393-81f6-11e4-a08d-a7a3bd2bfe1b} osdevice vhd=[K:]"\ALB3530\VHDs\WIN 10 TP x64.vhdx"
bcdedit /set {38f90393-81f6-11e4-a08d-a7a3bd2bfe1b} detecthal on
Pay attention in the path format:
Drive letter is between square brackets, and the remaining path is between double quotes
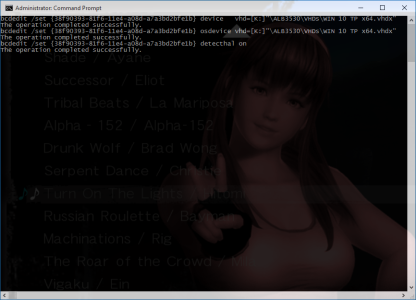
It should say "The operation completed successfully." after every command.Otherwise, you made some mistake, like wrong VHD file path, wrong syntax, etc.
If you type bcdedit again, it should display the new entry at the bottom, as below:
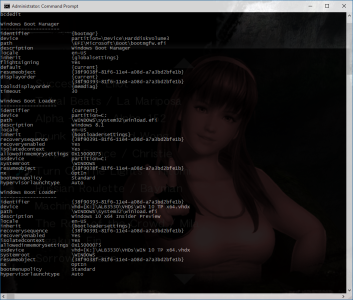
Now just restart the machine, and choose the operating system you've just added.
Scenarios where VHD Native Boot doesn't work:
-Not enough space in the host volume to accommodate VHD full size;
-The VHD is stored in a physical dynamic disk;
-The operating system installed to the VHD isn't Windows 7 Ultimate (or Enterprise), Windows 8/8.1 Pro (or Enterprise) and Windows 10 Pro (or Enterprise);
-The VHD is compressed or encrypted;
-The physical drive where the VHD is stored is protected by BitLocker;
Limitations of VHD Native Boot:
You can't upgrade the operating system that's running from a VHD in a physical machine (i.e.: upgrade Windows 7 to Windows 10);
That limitation can be easily overcome by upgrading the operating system in a virtual machine.
After that, just start the physical machine from that VHD.
If case of boot error, review the bcd entries.
Additional details:
A common cause that results in a blue screen when trying to boot from a VHD is when you don't have enough space in the host volume where the VHD file is stored to accommodate it's full size.
Eventhough the VHD was created as "Dynamically Expanding" (VHD file size is increased as disk is being filled), Windows expands it to its max file size when booting.
If it fails, you'll get a blue screen:
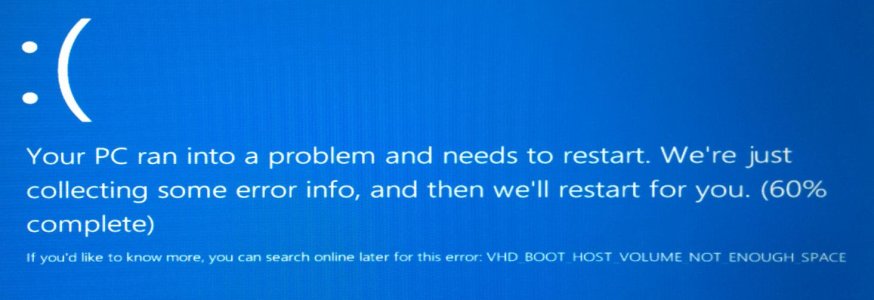
Also keep in mind Windows creates the page file in the host volume, so make sure you have enough space for that too.
If you attach the VHD disk (by double-clicking it) to the system, you can use its letter to set device and osdevice in bcdedit, like this:
bcdedit /set {38f90393-81f6-11e4-a08d-a7a3bd2bfe1b} device partition=K:
bcdedit /set {38f90393-81f6-11e4-a08d-a7a3bd2bfe1b} osdevice partition=K:
That way, you don't need to specify VHD full path.
3 - Install Windows 10 to a USB drive and run it from there
You don't need Windows To Go feature from Windows Enterprise to be able to boot Windows 8.1 (and above) from a USB drive.
Running Windows Insider Preview from a USB is a great feature, as you can take Windows with you.
All your files and applications, whenever you need them.
Here's how to do it:
Requirements:
Windows 8 Pro (or above) with Hyper-V enabled;
A USB hard disk drive;
Windows 8 (or above) ISO;
Short process:
Plug the USB drive in your PC.
After that, press Windows + X, and select "Disk Management".
Identify the USB disk there. (in my case, it was Disk 4).
Right click it the Disk (and not in its partitions), and select "Offline":
If you did it right, the disk should be displayed as Offline in Disk Management, as below:
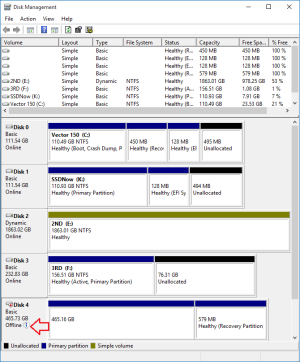
Now, go to Control Panel > Administrative Tools > Hyper-V Manager (requires administrative privileges)
Create a new virtual machine, and go to its settings.
In the Hard Drive, instead of using a "Virtual hard disk", choose "Physical hard disk".
Select the disk in the drop down menu, as below:

Now, use the Windows 10 installation ISO (for example) as the DVD disk in the virtual machine, and set the virtual machine to boot from CD.
Start the machine, and install Windows to the USB drive.
After the installation, shut down Windows in the virtual machine.
At this point, the USB disk is already bootable by any physical machine that supports USB boot.
Additional details:
-The reason it works is inside the virtual machine, the USB drive is not seen as a USB disk, since it's attached to an IDE controller;
-I'm not sure whether Windows 8 supports starting from a USB disk.Windows 8.1 Pro supports for sure.I don't know about the standard (non pro) editions;
-It might be possible to install Windows 10 directly to an USB Drive without all this, but at least Windows 8.1 Pro (and below) can't be installed to a USB drive.I just didn't test the direct installation yet for Windows 10.
-You don't need to bear with virtual machines if you don't want, as there's a alternate way to do it, that involves basically using ImageX utility to apply the install.wim (from installation media) image file to the disk, and make it bootable with bcdboot u:\Windows (where u: is the USB drive letter).Also, you may use other virtualization solutions (as VMware), but all this is beyond the scope of this tutorial.
If you have any questions, just ask them!
Best regards
All things explained here are not new, and are not "Windows 10 exclusive", but they're not very known.
For example, did you know you can boot Windows 7 in a physical machine from a virtual disk?
That's why I've decided to post this, both to make that information more public (once Windows Central is a good place for that), and also to make people able to test Windows 10 in a more realistic way, in order to determine whether those legacy applications (or even devices) will actually work on it.
With the Windows 10 release, I think it's the perfect time for such a guide.
Before starting, keep in mind you do it at your own risk.
I'll cover three things here, as follows:
1 - Convert a physical machine to a virtual hard disk
2 - Boot a physical machine from a virtual hard disk using VHD Native Boot
3 - Install Windows 10 to a USB drive and run it from there
While I will try to make it as short as I can (to avoid a boring reading), at the same time I won't omit important details.
Let's start:
1 - Convert a physical machine to a virtual hard disk
The idea behind this is you can clone your current physical machine to a Virtual Hard Disk file (VHD), thus being able to update the cloned machine to Windows 10, in order to test your apps and devices.By doing so, your real machine remains intact, and you can upgrade it later if your tests were successful.
Requirements:
Disk2vhd:
https://technet.microsoft.com/en-us/sysinternals/ee656415
Quick process:
Run Disk2vhd (it might ask for administrative privileges, and you should confirm it) from the machine where the hard disk you want to convert is in.

The process is very straightforward:
You mark the volumes you want to make a VHD from, choose a path in "VHD File name" for the destination disk, and press "Create".After the process completes, you'll have your disk(s) in a VHD form.
You can then start a machine from that disk, upgrade it to Windows 10, and test your apps, to see if all goes well.
Long details:
In order to make the resulting VHD bootable, when marking the volumes you want to convert to a VHD, you need to be aware the Windows partition (that one with Windows files and folders) and the boot partition (that one with the boot files) might be two separated partitions.
In that case, identify them in Disk2vhd, and make sure to mark both.
Disk2vhd has two options, marked by default.
"Use Volume Shadow Copy": It allows Windows' Volume Shadow Copy service to be used, what means you can convert the system disk (that's in use) to a VHD file.
"Use Vhdx": you can choose whether to use the newer Vhdx format, or the older vhd format.Basically, you only need to uncheck that option if both
you'll be booting a physical machine from the resulting VHD
and
Windows 7 is the main OS in the resulting VHD.
To short, only Windows 8 (and above) can be booted from a Vhdx in a physical machine. If you'll be upgrading to Windows 10 in a virtual machine, you can securely go for Vhdx, as it offers better performance and reliability than the Vhd format.
2 - Boot a physical machine from a virtual hard disk using VHD Native Boot
"VHD Native Boot" first appeared in Windows 7, and allows you to boot a physical machine from a virtual disk without having to touch in physical disk's partition layout.
You can use this technique to test your devices with Windows 10, once virtual machines can't access hardware devices directly.
Requirements:
A bootable VHD with Windows 7 or above;
A physical machine running Windows 7 or above;
Complete process:
Open the command prompt as administrator.
Type bcdedit and press enter.It should list the boot entries, like below:

In my case, there's just one operating system, plus the Windows Boot Manager (that's loaded before any operating system)
Next, type:
bcdedit /copy {current} /d "Windows 10 Pro x64 Insider Preview"
This should duplicate the current operating system's boot entry.
In this example, I've used "Windows 10 Pro x64 Insider Preview" as the description, but you can write your own here.
The command should return something like:
"The entry was successfully copied to {38f90393-81f6-11e4-a08d-a7a3bd2bfe1b}."

At that point, there should be one more operating system to choose from when starting the computer, called "Windows 10 Pro x64 Insider Preview".
Did you see that alpha-numeric sequence between curly braces?
Take note of that sequence, cause it's the identifier of new operating system you're adding to the boot entries.
You'll need it for the next 3 commands.
Note that "{38f90393-81f6-11e4-a08d-a7a3bd2bfe1b}" was generated randomly (better saying, according to my system), so you won't see that exact sequence in your machine.
In my case, it's {38f90393-81f6-11e4-a08d-a7a3bd2bfe1b}
Now, using File Explorer, locate the full path of the VHD file you want to boot from.
Let's suppose it's
K:\ALB3530\VHDs\WIN 10 TP x64.vhdx
Now, type the commands below, replacing {38f90393-81f6-11e4-a08d-a7a3bd2bfe1b} with the identifier you got.
Also, replace [K:]"\ALB3530\VHDs\WIN 10 TP x64.vhdx" with your VHD path.
bcdedit /set {38f90393-81f6-11e4-a08d-a7a3bd2bfe1b} device vhd=[K:]"\ALB3530\VHDs\WIN 10 TP x64.vhdx"
bcdedit /set {38f90393-81f6-11e4-a08d-a7a3bd2bfe1b} osdevice vhd=[K:]"\ALB3530\VHDs\WIN 10 TP x64.vhdx"
bcdedit /set {38f90393-81f6-11e4-a08d-a7a3bd2bfe1b} detecthal on
Pay attention in the path format:
Drive letter is between square brackets, and the remaining path is between double quotes

It should say "The operation completed successfully." after every command.Otherwise, you made some mistake, like wrong VHD file path, wrong syntax, etc.
If you type bcdedit again, it should display the new entry at the bottom, as below:

Now just restart the machine, and choose the operating system you've just added.
Scenarios where VHD Native Boot doesn't work:
-Not enough space in the host volume to accommodate VHD full size;
-The VHD is stored in a physical dynamic disk;
-The operating system installed to the VHD isn't Windows 7 Ultimate (or Enterprise), Windows 8/8.1 Pro (or Enterprise) and Windows 10 Pro (or Enterprise);
-The VHD is compressed or encrypted;
-The physical drive where the VHD is stored is protected by BitLocker;
Limitations of VHD Native Boot:
You can't upgrade the operating system that's running from a VHD in a physical machine (i.e.: upgrade Windows 7 to Windows 10);
That limitation can be easily overcome by upgrading the operating system in a virtual machine.
After that, just start the physical machine from that VHD.
If case of boot error, review the bcd entries.
Additional details:
A common cause that results in a blue screen when trying to boot from a VHD is when you don't have enough space in the host volume where the VHD file is stored to accommodate it's full size.
Eventhough the VHD was created as "Dynamically Expanding" (VHD file size is increased as disk is being filled), Windows expands it to its max file size when booting.
If it fails, you'll get a blue screen:

Also keep in mind Windows creates the page file in the host volume, so make sure you have enough space for that too.
If you attach the VHD disk (by double-clicking it) to the system, you can use its letter to set device and osdevice in bcdedit, like this:
bcdedit /set {38f90393-81f6-11e4-a08d-a7a3bd2bfe1b} device partition=K:
bcdedit /set {38f90393-81f6-11e4-a08d-a7a3bd2bfe1b} osdevice partition=K:
That way, you don't need to specify VHD full path.
3 - Install Windows 10 to a USB drive and run it from there
You don't need Windows To Go feature from Windows Enterprise to be able to boot Windows 8.1 (and above) from a USB drive.
Running Windows Insider Preview from a USB is a great feature, as you can take Windows with you.
All your files and applications, whenever you need them.
Here's how to do it:
Requirements:
Windows 8 Pro (or above) with Hyper-V enabled;
A USB hard disk drive;
Windows 8 (or above) ISO;
Short process:
Plug the USB drive in your PC.
After that, press Windows + X, and select "Disk Management".
Identify the USB disk there. (in my case, it was Disk 4).
Right click it the Disk (and not in its partitions), and select "Offline":
If you did it right, the disk should be displayed as Offline in Disk Management, as below:

Now, go to Control Panel > Administrative Tools > Hyper-V Manager (requires administrative privileges)
Create a new virtual machine, and go to its settings.
In the Hard Drive, instead of using a "Virtual hard disk", choose "Physical hard disk".
Select the disk in the drop down menu, as below:

Now, use the Windows 10 installation ISO (for example) as the DVD disk in the virtual machine, and set the virtual machine to boot from CD.
Start the machine, and install Windows to the USB drive.
After the installation, shut down Windows in the virtual machine.
At this point, the USB disk is already bootable by any physical machine that supports USB boot.
Additional details:
-The reason it works is inside the virtual machine, the USB drive is not seen as a USB disk, since it's attached to an IDE controller;
-I'm not sure whether Windows 8 supports starting from a USB disk.Windows 8.1 Pro supports for sure.I don't know about the standard (non pro) editions;
-It might be possible to install Windows 10 directly to an USB Drive without all this, but at least Windows 8.1 Pro (and below) can't be installed to a USB drive.I just didn't test the direct installation yet for Windows 10.
-You don't need to bear with virtual machines if you don't want, as there's a alternate way to do it, that involves basically using ImageX utility to apply the install.wim (from installation media) image file to the disk, and make it bootable with bcdboot u:\Windows (where u: is the USB drive letter).Also, you may use other virtualization solutions (as VMware), but all this is beyond the scope of this tutorial.
If you have any questions, just ask them!
Best regards
Last edited:

