- Sep 30, 2012
- 5,647
- 2
- 36
I've created this thread to become a community resource to find out lot's of Tips & Tricks to do with everything related to music on your Windows Phone Device. Have you found out a trick that someone else might not know about that helped you to solve a problem you were struggling with to do with your music and your Windows Phone device? I will keep the OP up to date with the best tips & tricks you guys offer to help other members of the community.
Windows Phone 7.x previously forced people to use the Zune software to sync music and other media to WP7 devices love it or hate it. This changed with Windows Phone 8. Microsoft enabled the WP OS to support the Media Transfer Protocol (MTP). This means you have a lot more choice which software you use to sync music and other media to your phone. MTP lets you use File Explorer in Windows 8 and other tools to view your own device, but it also means you are able to transfer media to your phone from third party applications. It's different from traditional USB Mass storage because it still uses it's own filing system and not anything similar to the filing system on a PC. Find out more about MPT here. This means WinAmp, Windows Media Player, iTunes, MusicBee and Songbird to- name a few.
To start the guide off I've included some of the tricks I've learned along the way. Feel free to reply to the topic to give feedback, work through your own issues or to add your own tips & tricks!
Tag everything first
Getting started moving music from pc to phone? Generally speaking before you transfer anything it's a good idea to make sure your music is tagged etc as you want it. This means that all the tracks are labelled correctly and that any album art is correct. Most programs will try to do this for you, like Windows Media Player. The phone won't have a chance of displaying the right lockscreen images for the artist you're playing if the music you're transferring isn't tagged correctly. Some WP apps like Xbox Music can add this information, but can sometimes get confused and start showing duplicate songs (especially if your music collection is in the cloud too). A few programs you can use to tag your music collection reliable are: MediaMonkey and Foobar2k
Use Windows Explorer
In my experience the quickest and simplest way of putting music on any device, SD card or whatever is to use the File Explorer (in Windows 8) or Windows Explorer (in older OS's). Head over to My Computer and you should see your device listed as a removable drive. Go into the device folder and you should see a set of folders (or an option to go
into the SD card folder). On WP8 devices the one you'll be most interested in is the Music folder. Pick the music you want on your device and drag and drop it into this folder. Your phone will automatically see these files and you're good to go.
Use the Equaliser
Chances are your WP8 device has some sort of equaliser for audio output. It will either be beats or dolby behind it but you should find it in your audio settings. It will allow you to tailor the sound coming from your device to how you like it and may offer extra features like beats audio or dolby audio filters when using headphones as well as other features like audio levelling. Some might prefer the sound offered without any of these extra filters but ultimately it's up to you. Well worth a look.
Extra Tip: If you have access to an equaliser like those on Lumia phones you don't have to use any of the pre-set sounds. You can tailor the specific sound you want to hear by tapping the individual bars and moving them around until you get exactly the sound you want to hear.
Set up a playlist to automatically sync through Windows Media Player
First of all you'll need to make your own play list through Windows Media Player. To do this simply right-click on the track you want in a play list and select “Add to >” then select the play list you want to be added to your phone. My play list is called “Lumia 920”. Now I've made a play list of music I want on my phone, how do I get it to sync to my device?
When you plug your phone into your computer and run Windows Media Player on the left column you'll see your device appears in the list. Right click on your device and the following options should appear:
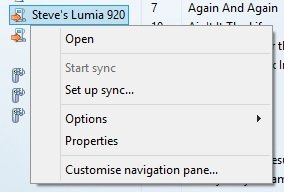
From here click on “Set up sync...” and the following Dialogue box should appear.
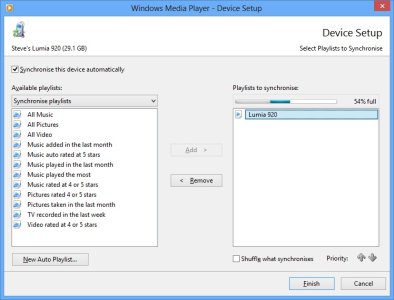
When you first see this screen you'll see the right hand column completely full of everything that's currently on the left-hand box. Remove everything in the right column by selecting it then pressing the “< Remove” button. Leave only the play list you want on your device in the right hand column, here it's “Lumia 920”. If you want to make this playlist sync to your phone automatically, make sure the check box in the top left of this dialog box is checked. It's worth noting that you can set Windows Media Player to automatically shuffle the different songs on your device, just check the box under the right hand column “Shuffle what synchronises”. When you're happy, press “Finish” and everything should be setup.
Sync your music at 320kbps through Windows Media Player
This is a trick I've only recently found out about but I've already noticed the difference in audio quality on the tracks I've transferred. Note: this will cause the music transferred to take up more space on your device, because the music files will contain more information, making them bigger.
By default in Windows Media Player the maximum bitrate you can sync your phone is 192kbps. This is just over half the bit rate of music from a CD, which is 320kbps. Depending on the headphones you use you'll be able to notice the difference in audio quality especially in the bass and high treble frequencies. You can, however, alter the registry to allow for higher bitrate transfers.
In Windows Media Player in the left column where your device is displayed, right-click and go to “Properties” and you'll see the following screen:
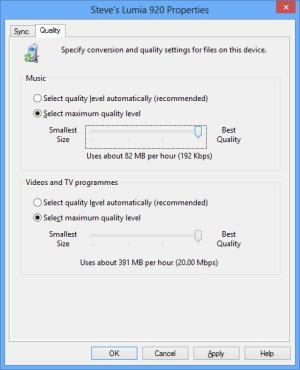
Go to the “Quality” tab and under Music make sure the radial button “Select maximum quality level” is selected. Here you'll see a slider with 4 settings, left to right will increase the music quality from 64 kbps to 192kbps. We want to alter the settings to sync at 320kbps when you slide over to the “Best Quality” option. Here's how you do it...
FAIR WARNING: This trick involves creating registry keys in Windows. If you don't know what the registry is or are unsure how to navigate around within it, you could cause some damage to your system so I would only recommend this trick to expert users.
Open the program regedit and go to:
HKEY_CURRENT_USER\Software\Microsoft\MediaPlayer\Preferences
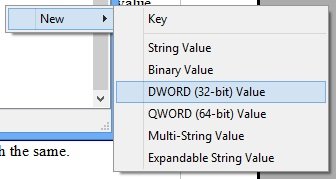
You'll be greeted with a scarily long list of registry keys that have a Name, Type and Data value. You need to right-click in a blank space and select “New>DWORD (32-bit) Value” and name the value “WMDMPreferredAudioBitrateValue4” (without the quotes). Next double click the DWORD Value and you should see a new dialog box open:
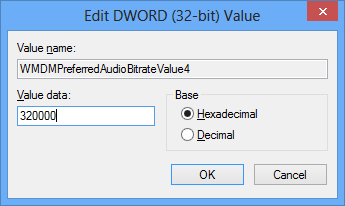
In the Value box, enter 320000 and make sure that the “Decimal” radial box is selected. In the dialog box you'll remember there were 4 settings. You can create DWORD values under here with the names "WMDMPreferredAudioBitrateValue1", "WMDMPreferredAudioBitrateValue2", "WMDMPreferredAudioBitrateValue3", or "WMDMPreferredAudioBitrateValue4". Those map out to the bps used for the sync, so 320kbps would be 320000. You only need to replace whichever of the four values you want to replace - if you don't create a registry value with that name, WMP will just use the default sync bitrate settings.
When you're done, press OK and close regedit. Next time you open Windows Media Player and navigate to the dialog box as shown above you should see the
following:
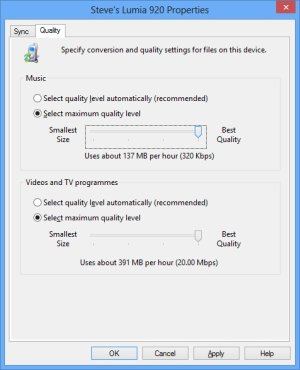
Now you should be able to sync your music to your device at 320kbps. Enjoy!
Podcasts and Windows Phone 8
In order to sync up podcasts in Windows Phone 8 with the ones you currently subscribe to, you'll have to use a third party application like iTunes on a computer or through third party applications on your phone itself. Here are a couple of recommended apps you can try:
Download podcasts when you have a connection for when you're on the move, WPodder will also remember where you last left off on the podcast you were last playing, so no need for searching through or missing anything! Feeds are automatically updated and it's simple to add new podcasts.
With this app you can listen to / watch audio and video podcasts as well as being able to download a podcast when you have a data connection so you can watch it on the move later.
Podcatcher arguably has the longest history of development here, and the functionality shows through. You can search through their large database of podcasts, add your own by RSS feed, browse a database from gpodder.net or manually import your own gpodder.net subscriptions. You are able to stream the podcasts or download them to your phone for offline listening as well as setting your podcasts to auto-download if you don't want to have to remember them. There are free and paid-for versions but with the free version the only limitation if you're limited to 2 podcasts.
These are by far the easiest methods to synchronise Podcasts on your WP device at the moment but I'll try to update this post with any other suggestions anyone else has found.
Duplicate music files?
This has been a fairly widespread problem especially when you're first trying to start to sort out music on your phone. If you've been trying to get files on your phone and just noticed there are 2 copies of each track and you don't know what to do, here are a few things you can do to fix the problem.
The first thing to try is: Open Xbox Music>Swipe the 3 dots at the bottom right of the screen upward>settings>Connect with Xbox Music>OFF. This will stop Xbox Music from trying to sync your music collection with the cloud, which it does by default.
If your problem persists try the following:
If you have a SD Card:
If you have a phone with no SD Card:
Missing Album Art
It seems to be quite a common problem that no matter how well you've organised your music collection on your PC, when you come to transfer the files over onto your device you can find grey squares coming up next to the artist or album instead of the correct images. I've had a look around and I've found 2 methods that seem to do the trick.
Method 1: Artist Images
Credit: V J
Method 2: MPAtool
Credit: WavingReds
If you still have album art that is just a grey box there is another method you can try. It's called MPAtool and you can download it onto your phone here: MPAtool | Windows Phone Apps+Games Store (United States)
This app will let you either manually attach images to the songs you want album art for, or it can go through your music collection and try to fill in the blanks itself. If you do use this app you might find some new files called “MPATool Dummy” or something like that. You can find all the dummy files this app makes by going to your music collection in the Xbox Music app, going to genre and selecting all the files that
appear. You can delete these files and it won't affect any songs or album art the app has made.
Using SkyDrive
Skydrive and pictures - requested by dgr_874I was asked if there was a way to sync a folder of pictures from a user's desktop to one or more phones automatically. After having searched around I discovered that the quickest and easiest way to do this was using SkyDrive. It's quick and simple to download the SkyDrive app from the store. When you've installed it you'll have to sign in with your Microsoft account. Once you've done that you'll be met with the SkyDrive app:
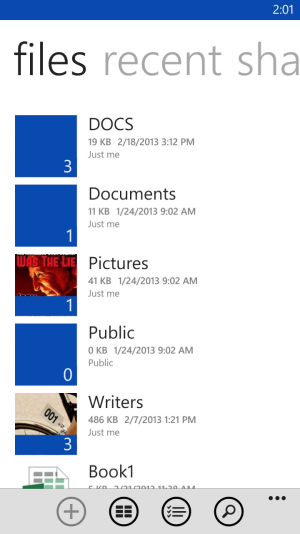
From here you can create new folders, upload pictures and other files from your phone, view thumbnails and download the files currently on SkyDrive. You can also manage your SkyDrive from any device from http://www.skydrive.live.com. In the example I was asked about I would create a folder that has all the pictures you want to be synced to your device on a PC and upload it manually to your SkyDrive. From here your files are in the cloud and can be accessed via the SkyDrive app. Your picture album will appear on the SkyDrive listing through the app on a phone and you can choose to download it or add more pictures to it.
If I find a way to streamline this process further, (or if you know of a better way tell me in the thread below), I will update this entry.
I don't know whatthis “Track 01” is, can I find out?
We've all come across music in our collections where over time we've just lost the information for the file and we're not really sure exactly who the song is by etc. I've come across an open source program thatyou can use on any platform completely free. It's a program calledMusicBrainz Picard. This program will analyse the file informationand fill out the blanks in your music files. This will tag your MP3'sproperly and even get album art. It will also let you tag the filesyourself manually if you want to.
Ifyou want to find out exactly how to start tagging your files inMusicBrainz Picard you can do so here:How to Tag Files With Picard - MusicBrainz
Becausethis app is open source you can contribute any information you maketo your own files to the database, so you can help other people andmake the database more accurate.
Giveit a try, it's free! You can download it here:MusicBrainz Picard - MusicBrainz
Get to Now Playingfrom the Lockscreen
Credit: Gurggles
We've all wanted to beable to quickly find out more information about a song that's playingor change playlist etc. on the move. The quick way to do this is asfollows:
Jump to a part of atrack
So I'm in the middle oflistening to a podcast or any music or video and I don't want to haveto listen/watch the entire thing through to get to where I wasbefore... can I skip to where I want to? Yep! Simply press and holdthe “>>” (fast forward) button if you want to go forward inthe track, or press and hold the “<<” (rewind) button ifyou want to go backwards in the track. When you get to the right partof the file you want, simply let go of the screen and the file willplay from there.
If you have any comments, tips or tricks that aren't listed here you think will benefit others, feel free to reply to this topic and I'll include the most useful suggestions in this OP.
Windows Phone 7.x previously forced people to use the Zune software to sync music and other media to WP7 devices love it or hate it. This changed with Windows Phone 8. Microsoft enabled the WP OS to support the Media Transfer Protocol (MTP). This means you have a lot more choice which software you use to sync music and other media to your phone. MTP lets you use File Explorer in Windows 8 and other tools to view your own device, but it also means you are able to transfer media to your phone from third party applications. It's different from traditional USB Mass storage because it still uses it's own filing system and not anything similar to the filing system on a PC. Find out more about MPT here. This means WinAmp, Windows Media Player, iTunes, MusicBee and Songbird to- name a few.
To start the guide off I've included some of the tricks I've learned along the way. Feel free to reply to the topic to give feedback, work through your own issues or to add your own tips & tricks!
Tag everything first
Getting started moving music from pc to phone? Generally speaking before you transfer anything it's a good idea to make sure your music is tagged etc as you want it. This means that all the tracks are labelled correctly and that any album art is correct. Most programs will try to do this for you, like Windows Media Player. The phone won't have a chance of displaying the right lockscreen images for the artist you're playing if the music you're transferring isn't tagged correctly. Some WP apps like Xbox Music can add this information, but can sometimes get confused and start showing duplicate songs (especially if your music collection is in the cloud too). A few programs you can use to tag your music collection reliable are: MediaMonkey and Foobar2k
Use Windows Explorer
In my experience the quickest and simplest way of putting music on any device, SD card or whatever is to use the File Explorer (in Windows 8) or Windows Explorer (in older OS's). Head over to My Computer and you should see your device listed as a removable drive. Go into the device folder and you should see a set of folders (or an option to go
into the SD card folder). On WP8 devices the one you'll be most interested in is the Music folder. Pick the music you want on your device and drag and drop it into this folder. Your phone will automatically see these files and you're good to go.
Use the Equaliser
Chances are your WP8 device has some sort of equaliser for audio output. It will either be beats or dolby behind it but you should find it in your audio settings. It will allow you to tailor the sound coming from your device to how you like it and may offer extra features like beats audio or dolby audio filters when using headphones as well as other features like audio levelling. Some might prefer the sound offered without any of these extra filters but ultimately it's up to you. Well worth a look.
Extra Tip: If you have access to an equaliser like those on Lumia phones you don't have to use any of the pre-set sounds. You can tailor the specific sound you want to hear by tapping the individual bars and moving them around until you get exactly the sound you want to hear.
Set up a playlist to automatically sync through Windows Media Player
First of all you'll need to make your own play list through Windows Media Player. To do this simply right-click on the track you want in a play list and select “Add to >” then select the play list you want to be added to your phone. My play list is called “Lumia 920”. Now I've made a play list of music I want on my phone, how do I get it to sync to my device?
When you plug your phone into your computer and run Windows Media Player on the left column you'll see your device appears in the list. Right click on your device and the following options should appear:

From here click on “Set up sync...” and the following Dialogue box should appear.

When you first see this screen you'll see the right hand column completely full of everything that's currently on the left-hand box. Remove everything in the right column by selecting it then pressing the “< Remove” button. Leave only the play list you want on your device in the right hand column, here it's “Lumia 920”. If you want to make this playlist sync to your phone automatically, make sure the check box in the top left of this dialog box is checked. It's worth noting that you can set Windows Media Player to automatically shuffle the different songs on your device, just check the box under the right hand column “Shuffle what synchronises”. When you're happy, press “Finish” and everything should be setup.
Sync your music at 320kbps through Windows Media Player
This is a trick I've only recently found out about but I've already noticed the difference in audio quality on the tracks I've transferred. Note: this will cause the music transferred to take up more space on your device, because the music files will contain more information, making them bigger.
By default in Windows Media Player the maximum bitrate you can sync your phone is 192kbps. This is just over half the bit rate of music from a CD, which is 320kbps. Depending on the headphones you use you'll be able to notice the difference in audio quality especially in the bass and high treble frequencies. You can, however, alter the registry to allow for higher bitrate transfers.
In Windows Media Player in the left column where your device is displayed, right-click and go to “Properties” and you'll see the following screen:

Go to the “Quality” tab and under Music make sure the radial button “Select maximum quality level” is selected. Here you'll see a slider with 4 settings, left to right will increase the music quality from 64 kbps to 192kbps. We want to alter the settings to sync at 320kbps when you slide over to the “Best Quality” option. Here's how you do it...
FAIR WARNING: This trick involves creating registry keys in Windows. If you don't know what the registry is or are unsure how to navigate around within it, you could cause some damage to your system so I would only recommend this trick to expert users.
Open the program regedit and go to:
HKEY_CURRENT_USER\Software\Microsoft\MediaPlayer\Preferences
You'll be greeted with a scarily long list of registry keys that have a Name, Type and Data value. You need to right-click in a blank space and select “New>DWORD (32-bit) Value” and name the value “WMDMPreferredAudioBitrateValue4” (without the quotes). Next double click the DWORD Value and you should see a new dialog box open:

In the Value box, enter 320000 and make sure that the “Decimal” radial box is selected. In the dialog box you'll remember there were 4 settings. You can create DWORD values under here with the names "WMDMPreferredAudioBitrateValue1", "WMDMPreferredAudioBitrateValue2", "WMDMPreferredAudioBitrateValue3", or "WMDMPreferredAudioBitrateValue4". Those map out to the bps used for the sync, so 320kbps would be 320000. You only need to replace whichever of the four values you want to replace - if you don't create a registry value with that name, WMP will just use the default sync bitrate settings.
When you're done, press OK and close regedit. Next time you open Windows Media Player and navigate to the dialog box as shown above you should see the
following:

Now you should be able to sync your music to your device at 320kbps. Enjoy!
Podcasts and Windows Phone 8
In order to sync up podcasts in Windows Phone 8 with the ones you currently subscribe to, you'll have to use a third party application like iTunes on a computer or through third party applications on your phone itself. Here are a couple of recommended apps you can try:
- SlapDash Podcasts: SlapDash Podcasts | Windows Phone Apps+Games Store (United States)
Download podcasts when you have a connection for when you're on the move, WPodder will also remember where you last left off on the podcast you were last playing, so no need for searching through or missing anything! Feeds are automatically updated and it's simple to add new podcasts.
With this app you can listen to / watch audio and video podcasts as well as being able to download a podcast when you have a data connection so you can watch it on the move later.
Podcatcher arguably has the longest history of development here, and the functionality shows through. You can search through their large database of podcasts, add your own by RSS feed, browse a database from gpodder.net or manually import your own gpodder.net subscriptions. You are able to stream the podcasts or download them to your phone for offline listening as well as setting your podcasts to auto-download if you don't want to have to remember them. There are free and paid-for versions but with the free version the only limitation if you're limited to 2 podcasts.
- Podcast Lounge: Podcast Lounge | Windows Phone Apps+Games Store (United Kingdom)
- TuneIn Radio: TuneIn Radio | Windows Phone Apps+Games Store (United States)
Arguably more than just a podcast app as it will give you access to local and global radio stations as well. Podcasts or any other radio station they have access to can be pinned to your start screen for easy access. This app requires an always-on data connection, though!
These are by far the easiest methods to synchronise Podcasts on your WP device at the moment but I'll try to update this post with any other suggestions anyone else has found.
Duplicate music files?
This has been a fairly widespread problem especially when you're first trying to start to sort out music on your phone. If you've been trying to get files on your phone and just noticed there are 2 copies of each track and you don't know what to do, here are a few things you can do to fix the problem.
The first thing to try is: Open Xbox Music>Swipe the 3 dots at the bottom right of the screen upward>settings>Connect with Xbox Music>OFF. This will stop Xbox Music from trying to sync your music collection with the cloud, which it does by default.
If your problem persists try the following:
If you have a SD Card:
- Format the SD card.
- Click the remove card option, then turn phone off, then remove the case, and then take out the SD card.
- Put the SD card in the computer and either sync with a program or drag the music files over into the music folder that was created after the format.
- Put the SD card back in your phone and you should find no duplicates.
If you have a phone with no SD Card:
- Connect your phone to the PC.
- Go through My Computer and navigate to the Music folder.
- Delete all the contents of folder.
- Re sync your music collection to your phone.
Missing Album Art
It seems to be quite a common problem that no matter how well you've organised your music collection on your PC, when you come to transfer the files over onto your device you can find grey squares coming up next to the artist or album instead of the correct images. I've had a look around and I've found 2 methods that seem to do the trick.
Method 1: Artist Images
Credit: V J
- In the Xbox Music app you'll need to find out which artists are missing album art. Once you know an artist, select the artist and on the artist page you'll see under the title “in collection” a grey square next to either an album or some songs you have from that artist.
- Under the song listings in the artist page, if the artist has information on the Xbox Music service you will see 2 down arrows in a circular box. Click on that down arrow and you'll see a list of available context on the Xbox Music service for that artist. You can now choose to play a preview song for that artist (you don't have to listen to the full 30 second sample). The album art that was grey will be downloaded and you should see the grey box be replaced with the album art.
Method 2: MPAtool
Credit: WavingReds
If you still have album art that is just a grey box there is another method you can try. It's called MPAtool and you can download it onto your phone here: MPAtool | Windows Phone Apps+Games Store (United States)
This app will let you either manually attach images to the songs you want album art for, or it can go through your music collection and try to fill in the blanks itself. If you do use this app you might find some new files called “MPATool Dummy” or something like that. You can find all the dummy files this app makes by going to your music collection in the Xbox Music app, going to genre and selecting all the files that
appear. You can delete these files and it won't affect any songs or album art the app has made.
Using SkyDrive
Skydrive and pictures - requested by dgr_874I was asked if there was a way to sync a folder of pictures from a user's desktop to one or more phones automatically. After having searched around I discovered that the quickest and easiest way to do this was using SkyDrive. It's quick and simple to download the SkyDrive app from the store. When you've installed it you'll have to sign in with your Microsoft account. Once you've done that you'll be met with the SkyDrive app:

From here you can create new folders, upload pictures and other files from your phone, view thumbnails and download the files currently on SkyDrive. You can also manage your SkyDrive from any device from http://www.skydrive.live.com. In the example I was asked about I would create a folder that has all the pictures you want to be synced to your device on a PC and upload it manually to your SkyDrive. From here your files are in the cloud and can be accessed via the SkyDrive app. Your picture album will appear on the SkyDrive listing through the app on a phone and you can choose to download it or add more pictures to it.
If I find a way to streamline this process further, (or if you know of a better way tell me in the thread below), I will update this entry.
I don't know whatthis “Track 01” is, can I find out?
We've all come across music in our collections where over time we've just lost the information for the file and we're not really sure exactly who the song is by etc. I've come across an open source program thatyou can use on any platform completely free. It's a program calledMusicBrainz Picard. This program will analyse the file informationand fill out the blanks in your music files. This will tag your MP3'sproperly and even get album art. It will also let you tag the filesyourself manually if you want to.
Ifyou want to find out exactly how to start tagging your files inMusicBrainz Picard you can do so here:How to Tag Files With Picard - MusicBrainz
Becausethis app is open source you can contribute any information you maketo your own files to the database, so you can help other people andmake the database more accurate.
Giveit a try, it's free! You can download it here:MusicBrainz Picard - MusicBrainz
Get to Now Playingfrom the Lockscreen
Credit: Gurggles
We've all wanted to beable to quickly find out more information about a song that's playingor change playlist etc. on the move. The quick way to do this is asfollows:
- Wake Screen / Tap
- Volume Control (if screen's not off) tapp the bottom section of the dropdown box that appears where the track name and band show.
- Your phone will open up the app you're using to play the music and take you to the'Now Playing' screen.
Jump to a part of atrack
So I'm in the middle oflistening to a podcast or any music or video and I don't want to haveto listen/watch the entire thing through to get to where I wasbefore... can I skip to where I want to? Yep! Simply press and holdthe “>>” (fast forward) button if you want to go forward inthe track, or press and hold the “<<” (rewind) button ifyou want to go backwards in the track. When you get to the right partof the file you want, simply let go of the screen and the file willplay from there.
If you have any comments, tips or tricks that aren't listed here you think will benefit others, feel free to reply to this topic and I'll include the most useful suggestions in this OP.
Attachments
Last edited:

