Qi Charging on a LUMIA 1520 AT&T phone (Solution)
- Thread starter Benny Vallejo
- Start date
You are using an out of date browser. It may not display this or other websites correctly.
You should upgrade or use an alternative browser.
You should upgrade or use an alternative browser.
GrayW0lf
Member
- Jun 7, 2012
- 481
- 0
- 16
Don't be too surprised if the t3 torx bit doesn't work for the phone. I had to resort to t2 bit myself.I picked up my 920 coil on Amazon for $22.12 from bestmatch. Despite the long estimated ship time it came in about a week and looks new. I was waiting on my t3 which I got today to do this mod.
Sonartech
New member
- Dec 17, 2013
- 43
- 0
- 0
The only disassembly video for the 1520 that I could find is, in a word, useless. It requires the use of a frame that isn't commercially available (as far as I know). I attempted to use a thin plastic tool to gently remove the unibody from the case without luck. It felt too much like I would bend, break or at least overly compress the external material of the unibody too much. I knew that this would not be a simple task but when step 1 is this much trouble, I find myself wanting to go through with it a lot less.
Did you get it figured out? If not, I can put together a step-by-step guide for disassembly.
SonarTech
GrayW0lf
Member
- Jun 7, 2012
- 481
- 0
- 16
Unfortunately, no. I gave up and posted out of frustration since I did slightly dent the unibody in my attempt to remove the shell.Did you get it figured out? If not, I can put together a step-by-step guide for disassembly.
SonarTech
I would appreciate a guide if you have the time to write it up!
soloist_huaxin
New member
- Nov 16, 2012
- 86
- 0
- 0
Has anyone actually ordered this part from eTrade Supply? I went by just to check out price and shipping for a US address and the total came to $43.91 for economy shipping. That's a bit steep considering the other odds and ends I would need to pick up to do this project. Luckily I already own a soldering iron and solder.
I ordered my 920 replacement screen from them a while back after getting scammed by some ebay seller. Yeah their shipping cost is between insane and ultra-insane, but the quality of parts is every bit as advertised. If you can handle the cash turnaround I'd suggest order a bunch and resell on ebay.
NoRomBasic
New member
- Apr 5, 2012
- 147
- 0
- 0
I picked up my 920 coil on Amazon for $22.12 from bestmatch. Despite the long estimated ship time it came in about a week and looks new. I was waiting on my t3 which I got today to do this mod.
I got my 920 Coil today from iPart Inc on Amazon for $22.88 delivered. Unfortunately they seem to be out of stock now.
Shame too as they were nice enough to include both a T2 and T3 torx screwdriver as well as a plastic case opening tool. That was a pleasant surprise.
Now all I need to do is work up the gumption to make the mod.
Amazon.com: Wireless Charging Charger Coil Flex Cable Ribbon Repair For Nokia Lumia 920: Cell Phones & Accessories
Citizen X
New member
- May 11, 2013
- 524
- 0
- 0
I ordered my 920 replacement screen from them a while back after getting scammed by some ebay seller. Yeah their shipping cost is between insane and ultra-insane, but the quality of parts is every bit as advertised. If you can handle the cash turnaround I'd suggest order a bunch and resell on ebay.
Thanks. I figured it was something like that. I contemplated ordering a few to modify other phones but I really needed just one first to see how it goes.
Thanks to everyone for posting about your sources. I'm still working up the nerve to do this mod on such a beautiful phone!
GrayW0lf
Member
- Jun 7, 2012
- 481
- 0
- 16
Qi Wireless Charging Receiver Coil Tag Repair Free Tools Fix Set for Lumia 920 | eBay
That's the eBay seller that I bought my Qi Charger from. Shipping was a bit slow but the overall cost made up for it.
That's the eBay seller that I bought my Qi Charger from. Shipping was a bit slow but the overall cost made up for it.
Sonartech
New member
- Dec 17, 2013
- 43
- 0
- 0
Nokia Lumia 1520 Disassembly Instructions
Hope that gets you going in the right direction. We've taken apart about 20 of these things without damaging the display, gasket or polycarb body. The only other recommendation I have is to be #@!$ sure you're done inside the device before closing it up. Repeated opening & closing will loosen things up and will risk leaving ugly dents in the shell around the gasket. Take pictures of your work before you close it up so you have something to reference if you feel that burning desire to to re-open your device to have another look at things...
Good Luck!
SonarTech
- Read all of these instructions first, before you actually start the work and make sure you understand what they mean entirely.
- Remove SIM Tray.
- Remove micro-SD Card Tray.
- Remove White Sticker with Style 2A flat-head tweezers (or other very fine-tipped tweezers). Try to preserve the label integrity - slow and patient removal.
- Remove tiny screw using Torx T2 driver.
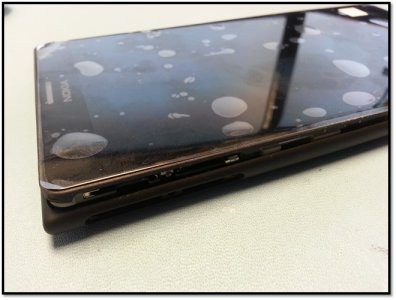
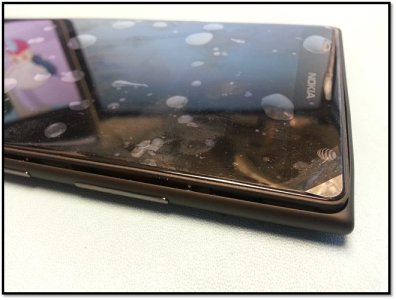
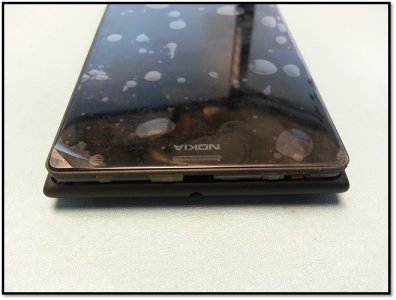
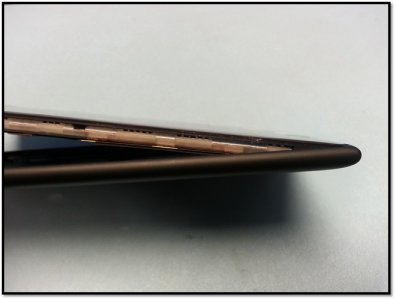
- Separate the case from the display. Refer to the pictures below for detail. Avoid pressing the Power Button during this process.
- Using a Thin Flat Tool (Style 2A Flat Tweezers, Nokia Guitar Pick Tool, Fingernail) pick one side and gently insert between the plastic edge of the case and the rubber gasket around the display. Take care not to smoosh the rubber gasket too much, and definitely don't use something that will tear or cut into the gasket.
- Release the clips by pushing down on the plastic and gently work your way around the entire side. Work your way to the top corner, but do not do this for the bottom corners. Watch out for the power button! If you accidentally hit it and the phone boots, let it finish booting then properly shut it down and continue.
- Once both side and the top clips are free, gently pull the display up and away from the bottom part of the case to release the bottom clips.
- The shell disassembly process is complete. The re-assembly process is just the reverse of this:
- Groom the rubber seal to make sure it is flush with the body of the display and that there are no egregious nicks or stretches in the seal. Fair it out as best you can if needed.
- Verify that there is no debris or crud left in the shell before re-assembly. Check the side buttons to make sure the button fairings are still seated.
- Slide the bottom part of the 1520 display into the polycarb shell bottom at an angle, allowing those clips to engage.
- Grow some ballz.
- Violently and viciously snap the absolute christ... Wait, let me re-phrase that. Gently start from the bottom and snap the display back into the polycarb shell, working your way to the top. Never mind the disgusting sounds it might make. Grow some ballz already! Snap, Snap, SNAP!!
- Once the display is reseated into the body, check only the Volume Up, Volume Down and Camera buttons for proper tactile response, meaning you got the case centered into the shell properly. DON'T push the power button yet (or the phone will boot, and you'll need to shut it down anyway after re-inserting your SIM).
- Replace the Torx T2 screw. WARNING: DO NOT OVER TIGHTEN! It is extremely easy to strip-out this tiny screw, and you don't have a replacement!
- Re-apply the label, if you still have it in one piece.
- Re-install your SIM Tray and micro-SD Tray.
- Power-on the device and test your buttons one last time. Also test camera flash, and you're done!
Hope that gets you going in the right direction. We've taken apart about 20 of these things without damaging the display, gasket or polycarb body. The only other recommendation I have is to be #@!$ sure you're done inside the device before closing it up. Repeated opening & closing will loosen things up and will risk leaving ugly dents in the shell around the gasket. Take pictures of your work before you close it up so you have something to reference if you feel that burning desire to to re-open your device to have another look at things...
Good Luck!
SonarTech
Last edited:
GrayW0lf
Member
- Jun 7, 2012
- 481
- 0
- 16
Once again, Sonartech, you are a freaking awesome person for taking the time to provide such detailed instructions for our use. I actually did ding the rubber around the unibody a little bit during my failed/aborted attempt to remove my phone. When I do remove it, I'll check to see if I can smooth it back out. With any luck, it's just pressed down too much/slightly weakened and not torn. Otherwise, I will just have to keep a close eye on that section of the phone going forward.
THANK YOU for putting the stern warning at the beginning of your instructions, as well - may that warning help others to avoid damaging their unibody's rubber surround as I did
PS - I also wasn't so careful with the IMEI sticker.. but I wasn't intending to even try to return or otherwise get warranty support, so I would hope that the sticker isn't critical for me otherwise.
Last edited:
myrandex
Member
- Aug 20, 2009
- 63
- 0
- 6
Sonartech, first of all thanks so much for posting all of your helpful content on here. I just ordered this phone yesterday and I didn't research that much before I did (I kind of jumped at a special offer that I received). I've made a decent investment in Qi charging devices and definitely want to get Qi working on my 1520 when it comes in.
Have you given any thought to using a Lumia 925 charging plate's internal circuitry for this? I observed a video on youtube where some people modded a 925 to have built in wireless charging by using that circuitry and it was done without any soldering (the reason I say this is I haven't soldered in years and the last time I did it was nowhere near as neat as your excellent work). Here is the video: DIY: Nokia Lumia 925 Wireless Charging Mod smotretrusskoe.ru
That does appear to be an elegant solution. It might benefit from some form of attachment (such as soldering) but it makes use of the 3 pin connector on the back of the phone to communicate to the wireless charging components.
Thanks,
Jason Cook
Sonartech
New member
- Dec 17, 2013
- 43
- 0
- 0
Hey, Jason -
I did have a look at this many months ago, but the key difference here is that the 925 was made to support both PMA and Qi-compatible charging back covers, and although the pin spacing on the 1520 looks very similar to the pin spacing on the 925 covers, it is unfortunately not the same. The 1520 has a wider spacing than the 925 cover, so folding over the flex to form a pressure-contact isn't going to work. Additionally, I think the pinouts are different, but I never confirmed that detail 100%. Both PMA and Qi-compatible cases are available for the 925, but there are no plans to release a Qi-compatible cover for the AT&T 1520, because that specifically goes against AT&T's release agreement with Nokia. Nokia's work-around for that was to release the International 1520, which as we all know, has Qi-charging support built-in.
The goal here was to find a way to support Qi-charging on a device that is specifically designed not to support Qi-charging, per AT&T's requirements.
As of yet, I haven't been able to locate a self-contained Qi-coil that has pinouts that directly match the pin arrangement and spacing found on the back of the 1520. I don't know where they came up with the pin spacing used, but I'm absolutely certain Nokia designed the 1520 pin spacing to be intentionally non-compatible with the existing Qi-charging covers. As I typed earlier, I think they also dicked with the polarity and trigger on the pin arrangement as well, but I'm not certain of that. I abandoned this path after I found the pin spacing was several milli-meters different.
Now, that said, there is nothing that keeps you from buying a PMA charging cover for the AT&T 1520, gutting the PMA coil out of it, and replacing that coil with a Qi-compatible coil. That would at least let you have the Qi-charging capability without opening your 1520, but you're still going to have to solder the Qi-coil to the PMA cover's flex somehow...
So, the short of it is that I haven't found a way to do this solder-free. Apart from pre-building the mods and selling them, I don't have a reasonable alternative for how to get around at least some soldering.
I'm always looking for improvements, so if I figure out how to get around this requirement, I'll definitely post something here.
Cheers,
SonarTech
GrayW0lf
Member
- Jun 7, 2012
- 481
- 0
- 16
So the "good news" from my side is that I did successfully get the phone apart using the little plastic prying tool that came with the Qi Wireless charger that I bought off eBay. The process was every bit as easy-and-clean as Sonartech's instructions indicated. After getting the polycarbonate case separated from the phone's unibody, I looked at the PMA flex cable under a 2x magnification lens from the X-Acto "Helping Hands" kit. With light directly hitting the flex, I could see the lines under the black coating, as Sonartech indicated. However, 2x magnification is really not enough for my comfort. I'd started to gently remove the black coating on the flex but changed my mind on moving any further with the process due to inadequate lighting and a lack of a replacement flex if I should screw things up. I "cleaned up" by putting a very thing slice of electrical tape over the area on the flex that I scraped open and then reassembled the phone as per Sonartech's instructions.
Reassembly was as "crunchy" as he indicated but the effort needed to reinsert the unibody into the shell wasn't as much as I feared (based on the bold-red text in his instructions ). I also managed to correct the small "smooshing" of the rubber surround from my original attempt to open the phone up.
If/when I find a source for replacement PMA flex cables, I will probably buy 1-2 of them in order to try the modification before I crack this phone open again. I don't really want to buy a 20x magnifier and the phone is otherwise "fine" for me - even without wireless charging... for now.
Sonartech: Thank you, again, for your time and effort. I'm glad that you are as skilled as you clearly are. I hope that those you've modded the phone for are getting lots of enjoyment out of their phones. You are awesome for spending the time that you have put in to give us all the instructions needed to replicate your work. One day, I might be able to follow in your footsteps.. it just won't be today, unfortunately.
Reassembly was as "crunchy" as he indicated but the effort needed to reinsert the unibody into the shell wasn't as much as I feared (based on the bold-red text in his instructions
If/when I find a source for replacement PMA flex cables, I will probably buy 1-2 of them in order to try the modification before I crack this phone open again. I don't really want to buy a 20x magnifier and the phone is otherwise "fine" for me - even without wireless charging... for now.
Sonartech: Thank you, again, for your time and effort. I'm glad that you are as skilled as you clearly are. I hope that those you've modded the phone for are getting lots of enjoyment out of their phones.
dougolupski
New member
- Nov 11, 2012
- 34
- 0
- 0
Does anyone have a source for the backplate besides the Ebay guy in Spain? The lens on my camera cracked and I need to replace it. I dont have an issue with the Spanish ones but if there are the US models around I would rather get on of those.
TheBadGuy_88
New member
- Oct 28, 2012
- 159
- 0
- 0
Does anyone have a source for the backplate besides the Ebay guy in Spain? The lens on my camera cracked and I need to replace it. I dont have an issue with the Spanish ones but if there are the US models around I would rather get on of those.
Nokia Repair Parts - Nokia Lumia 1520 - Parts4repair.Com I've gotten original repair parts from there, legit
myrandex
Member
- Aug 20, 2009
- 63
- 0
- 6
Well my 1520 came in a couple of days ago and I finally got it all up and running. I'm not convinced that I'll keep it. I'm running into a situation where I believe my IT department will not allow the phone to sync due to it having an SD card slot. I'm having trouble getting it to work and if I can't get it operational I'll probably have to sell it or return it and go back to my 920, which feels truly tiny now.
If I do keep it I'm planning on undertaking this procedure. I know a couple of engineers in the area with soldering experience and equipment so I might see if they would be willing to help out.
If I do keep it I'm planning on undertaking this procedure. I know a couple of engineers in the area with soldering experience and equipment so I might see if they would be willing to help out.
NoRomBasic
New member
- Apr 5, 2012
- 147
- 0
- 0
So just to provide some more feedback to this forum, Ithought I?d thought I?d post my experience with an attempted QI installationtoday.
First off Thanks to Sonartech for his outstandinginstructions and photos. Whileultimately I wasn?t successful, it certainly wasn?t because of any lack withregards to everything he has posted and all the feedback he provided.
Second, unfortunately for me I screwed up the PMAFLEX piece andas Sonartech has noted, those aren?t growing on trees right now so until thoseturn up as a replacement part (or possibly as part of an ATT replacement shell,which is how it seems the International Shell is done) I?ll have to hold off ontrying this again for the time being.
Anyway, for anyone who is determined to do this, I?m not going to rehash thealready provided instructions or provide any additional disassembly photos,again everything Sonartech has provided is really all you need. But I will provide a few observations:
Until then I?ll be looking for a way to buy/acquire a new PMAFLEX, or if it isincluded a replacement ATT shell in some color other than black.
Thanks again to everyone who have been contributing this thread.
First off Thanks to Sonartech for his outstandinginstructions and photos. Whileultimately I wasn?t successful, it certainly wasn?t because of any lack withregards to everything he has posted and all the feedback he provided.
Second, unfortunately for me I screwed up the PMAFLEX piece andas Sonartech has noted, those aren?t growing on trees right now so until thoseturn up as a replacement part (or possibly as part of an ATT replacement shell,which is how it seems the International Shell is done) I?ll have to hold off ontrying this again for the time being.
Anyway, for anyone who is determined to do this, I?m not going to rehash thealready provided instructions or provide any additional disassembly photos,again everything Sonartech has provided is really all you need. But I will provide a few observations:
- For those of you who are concerned aboutremoving the shell from the 1520; with just one exception, really, it is veryeasy. Possibly the easiest shell toremove of any phone I?ve messed with (and I have taken a few apart). The only exception is that %$#@ little screwbetween the SIM and MicroSD card slots. Asothers have noted, it seems like a T2 is too small and a T3 is too big. In addition, at least in my case it seemedlike it was tightened at the factory by a very enthusiastic worker. While I didn?t completely strip the head, it definitelysuffered some damage. In the future I?lllikely be looking for a torx specifically sized for Nokia (if such a beastexists). Other than that the phone comesout of the shell surprisingly easily. I?drecommend using something made of semi-soft plastic to loosen/pry the edges ofthe case (I?ll toss in a picture of a small tool that came with a generic phonedisassembly kit I got a while back as it was close to perfect for this job, butanything similar would do nicely). Andthe trick is to work out the top area first, starting with the Sim door side,then the volume rocker side, then the top. Once the top is freed, simply pull the phone upward and away from thecase so the bottom slides up within the case a bit before coming out. Because of my troubles with getting things towork, I got VERY good at this procedure. But really it wasn?t hard.
- As others have advised, I would get a goodstand/part holder. A magnifying glasswould help, but I didn?t have one and my vision is generally pretty good. So Ididn?t feel an absolute need.
- A multimeter is a MUST. Not having one was probably my biggest mistaketoday. It my case it led to way too muchassembly/disassembly and eventually it caused what I think is a cold-short inthe PMAFLEX towards the top. I have aquality unit, but it was 600 miles away and I got a little too eager to trythis out. Don?t be me.

Until then I?ll be looking for a way to buy/acquire a new PMAFLEX, or if it isincluded a replacement ATT shell in some color other than black.
Thanks again to everyone who have been contributing this thread.
- Michael
Attachments
- Sep 28, 2013
- 78
- 0
- 0
@NoRomBasic... I was also afraid to ruin my flex cable once i opened up the phone and saw how thin and tiny it was. In no way was i going to attempt to butcher it. Instead, i went with soloist_huaxin's suggestion and just soldered the 3 pin connections on the bottom of the flex to the 920 qi coil. the outer 2 negative and the middle one positive and voila! It will be a lot easier in my opinion to remove the solder from the 3 pins without literally hacking away into the actual flex cable. Just a heads up next time.
Similar threads
- Replies
- 20
- Views
- 6K
- Replies
- 25
- Views
- 5K
- Locked
- Replies
- 3
- Views
- 2K
- Replies
- 15
- Views
- 3K
Trending Posts
-
-
Windows 11 Power Icon Remotely changed! (Percentage Gone)
- Started by Fifth313ment
- Replies: 0
Forum statistics

Space.com is part of Future plc, an international media group and leading digital publisher. Visit our corporate site.
© Future Publishing Limited Quay House, The Ambury, Bath BA1 1UA. All rights reserved. England and Wales company registration number 2008885.

