- Sep 30, 2012
- 5,647
- 2
- 36
Believe it or not you can take fantastic pictures with your phone. Yeah, I'm being serious. Even the worst camera in the right hands can take amazing photos. So can you with whatever camera you have. Most camera's will have limitations - even DSLR's! The purpose of this guide is to try to help you to get back to basics and improve your pictures.
Part 1 - Before the Shot
Learn your camera
Each camera is different. Some cameras will take lighter pictures, some darker and so on. The only way for you to start getting good results with your camera is to actually use it. Take pictures! Who cares if you're only going to delete them? Each time you have a session with your camera you'll learn more and more about its strengths and weaknesses and the best way to get jaw-dropping pictures is to play to your camera's strengths.

The anatomy of the view screen -
Left arrow - at the top left of the screen is a left arrow. Swiping to the right or pressing this button will allow you to view the pictures you just took quickly and easily.
... - At the top right of the screen you'll notice there's 3 dots. Pressing these dots will expand the menu so you can access the photo and video settings menus.
Switch to Video / Photo - Pressing this icon will switch your camera mode from photo (default) to video, if you want to record a video.
Front-Facing Camera - If your phone has a front-facing camera you can press this button to switch the viewfinder's video feed over to this. Press it again to switch the viewfinder back to the rear camera (default).
Flash mode - There are 3 flash modes; flash off, flash on and auto. What more can I say? Keep pressing this icon to switch to the mode you want.
Lenses - The icon that looks like a left and right arrow will bring up the lenses. These are mini-apps that add functionality to your camera in some way or another.
[tip]If you are seeing pictures that look perfectly sharp when you're focusing on a subject and after the picture is taken, everything seems to blur it's because Windows Phone saves a low-res preview of your image for you to zoom into and look around. It's low-res in order to keep the performance high, but unfortunately this means that you're seeing a lower quality, more blurred image than the picture you just took really is. If you want to view your photo in its true quality you can either view your pictures on a PC monitor or install the HD Photo Viewer app.[/tip]
Set your expectations
As I will go onto say in the following posts, you need to understand your camera's strengths and weaknesses in order to take a good picture with it. No matter what picture you want to take, if you are trying to take a picture that your phone's camera isn't suited to (one of it's weaknesses) you will not get a good picture from it. What this means is that it's absolutely essential that you know your camera's limitations and have them in mind when you're trying to take pictures.
Aperture and F-numbers?
I think we can all agree that photography is all about controlling light. I've done a lot of reading around this subject, as it seems people have unrealistic expectations of the capabilities of their phones and it's all directly tied to this.
What the heck is aperture? Isn't it a form of science?
Aperture is the diameter of the lens opening. Our phones have fixed apertures. On a bigger camera, there will be a mechanism that opens and closes. The larger the diameter of the aperture, the more light reaches the sensor.

Not to scale.
Aperture is the size of the opening in the lens when a picture is taken. It's measured in F-Stops. Moving from one F-Stop to the next doubled (or halves) the amount of light getting through your lens. We can't control the size of our camera's apertures, because they're physically fixed. Below is a rundown of current Windows Phones f-stops:
HTC 8x: f/2.0
HTC 8s: f/2.8
Nokia Lumia 1020: f/2.2
Nokia Lumia 928: f/2.0
Nokia Lumia 925: f/2.0
Nokia Lumia 920: f/2.0
Nokia Lumia 820: f/2.2
Nokia Lumia 720: f/1.9
Nokia Lumia 620: f/2.4
Nokia Lumia 520: f/2.4
So what does this mean for you? All of the current phones have an f-stop between 1.9 and 2.8. Generally speaking: the smaller the number the larger the hole. Remember that. A 'fast' lens is one that has a large maximum aperture - that means we can use our phones in a wider variety of situations. The larger the aperture, the better your camera will perform in low-light situations, since a larger lens opening will let more light in than a smaller lens opening. It also means that having a larger aperture will let you use a faster shutter speed to freeze action so your pictures will be sharper and better detailed.
Focal Length and Depth of Field
So my phone is built to let me take pictures in a wide variety of situations how will that affect the pictures I take? Let me introduce you to focal length and depth of field.
Focal length - This is the distance between the lens and the camera's sensor. For our phones the distance varies between 20-35mm. A phone like the 920, for example, has a focal length of 26mm. So what? Because the distance between the lens and the sensor are so short that means our phones camera's have a wide angle of view. The wide the angle of view the greater the area captured.

Depth of Field - This is the distance that objects are in focus. Sometimes you'll want something close to you to be in focus (like a portrait), and sometimes you'll want something far away to be in focus (like a landscape). The aperture of your lens determines exactly how well you can focus on near and far objects.
Because our phones have such large apertures (f1.9-2.8) this means that our phones are designed to handle subjects close-mid range really well. Any photographer will tell you that you need to have a smaller aperture of something like f/8.0 (remember: f/8.0 is a smaller hole than f2.0, meaning less light is let into the sensor) to be able to capture details further away, as you'd expect in your average landscape. This is why we can't reasonably expect our phones to take crystal clear images of objects on the horizon; with such a small fixed aperture they simply aren't designed to take pictures aimed at mid-far range.
 These photos were taken from the same place with different lenses - the mm value is the focal length of the camera. You can see our phones cameras are similar to the first two pictures. The subject is Longs Peak from Upper Beaver Meadows in Rocky Mountain National Park, taken by David Dahms.
To be clear, this is a universal issue, or 'weakness' if you will. The lens on any camera phone today, whether its the 920, 928, HTC One etc. will have small sensors and fixed-aperture lenses. This is because we demand to be able to point and click at a wide variety of subjects at all times of the day and your average user in their urban location is going to take pictures at close-mid range. If you want a camera that will take really amazing pictures both far and near you're going to want to buy a dedicated camera.
As you experiment with your camera and find out its strengths remember that this fixed aperture is both a strength and a weakness and it's honestly up to you, the photographer, to use it well to take stunning pictures.
If you want to find out more about Aperture and F-Stop and how it will affect the photos you want to take, check out any of the following links:
http://www.ethiriel.com/wordpress/archives/676
http://www.photoxels.com/digital-photography-tutorials/tutorial-aperture/
Focusing: Tap-to-focus vs. Shutter button
If you press the shutter button down half-way your camera will focus on whatever is in the centre of the frame. Once you hear the beep, confirming focus, press the shutter all the way down to capture the photo. If you want to focus on a specific area of the screen, you can tap on that part of the screen and you should see a focus 'box' appear around the area you tapped. Your phone will focus on that area instead of in the centre of the frame. This is particularly good when you have elements in both the foreground and background and you only want to focus on one of them. Arguably, your phone will take slightly sharper pictures if you tap the screen because there isn't so much movement from physically depressing a button, but on phones like the 920 series with Optical Image Stabilization this shouldn't matter so much.
Your Phone's Sensor
On our phone cameras we don't have a physical shutter that lets light in for a certain amount of time, so our sensor is 'powered up' for the amount of time the phone determines the sensor needs light to capture the picture. This could mean that an electrical current is passed through the sensor, allowing it to receive and process light, for as little as 1/250 of a second or even more. Our camera phones use something called a Back Side Illuminated Sensor (BSI), which you can read a bit more about by clicking here. When we're talking about sensors, bigger is definitely better. The bigger your sensor, the more transistors you can fit on your sensor and bigger transistors produce less noise and are better at gathering light in the same amount of time.

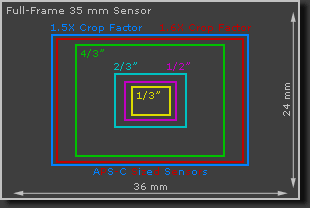
Camera sensors are compared to their 35mm motion picture film cameras that became the standard by which most SLR camera systems were based. If we consider the 35mm 'full frame' sensor to be the benchmark, the sensors in current generation Lumia / HTC devices are 1/3" or smaller. That's the yellow box in the middle or something slightly smaller than that. Next time you look at the picture you just took on your phone and start complaining its got too much noise, remember the part of your camera that actually processes the light is smaller than the size of the average 'pinky' fingernail. Kinda brings it into perspective doesn't it?
Okay, so how does this affect me? When your sensor is 'turned on' to capture light for that tenth of a second or less it's measuring the light of your scene, which is an analogue value, measured by individual transistors on the sensor. That value is then processed and turned to digital information. Our phones are really good at resolving this information when it comes to close-medium range information but look at something a little further away that's a flat colour like the sky and you'll notice a bit of noise, even taken at ISO 100. (Keep reading to find out exactly how noise and ISO works.) Now, this noise isn't ground-breaking, all camera's have a little bit of noise in some situations, and it certainly won't ruin your picture but you have to bear in mind the size of the sensor on your phone. I'm not saying your phone's camera is bad - far from it. I think phone cameras are amazing for the quality of the image they produce, but if you have expectations that you're going to be able to take pictures just as good, sharp and clear of mid-far distance objects, as mentioned above - you need to consider buying a dedicated camera.
SkyDrive Auto Upload
On Windows Phone a lot of people like to set-up their camera to automatically upload the pictures they just took to their SkyDrive account in the cloud - even more so now that we're able to upload full-resolution pictures from our phones. So how do you set your phone up to do this? Here's how:
Go to your Photo's Hub and tap the '...' at the bottom of the screen. A menu will appear, tap on the settings menu.
Near the bottom of the photos + camera settings you'll see 'Auto Upload' and SkyDrive. Tap on the word 'SkyDrive' and the following menu will appear:

From here you can pick your settings to automatically pictures to your SkyDrive account. If you want to upload your pictures at full-resolution, choose 'Best quality (needs WiFi)' but as is suggested, your phone will only upload pictures when it's connected to an active WiFi network. Good quality will downsize your photos a little, but you can use either a WiFi or Data connection for this - but be warned, this could cost you depending on your data plan.
Keep reading to find out some tips about how to approach the shot, and lots more!
Part 1 - Before the Shot
Learn your camera
Each camera is different. Some cameras will take lighter pictures, some darker and so on. The only way for you to start getting good results with your camera is to actually use it. Take pictures! Who cares if you're only going to delete them? Each time you have a session with your camera you'll learn more and more about its strengths and weaknesses and the best way to get jaw-dropping pictures is to play to your camera's strengths.
Left arrow - at the top left of the screen is a left arrow. Swiping to the right or pressing this button will allow you to view the pictures you just took quickly and easily.
... - At the top right of the screen you'll notice there's 3 dots. Pressing these dots will expand the menu so you can access the photo and video settings menus.
Switch to Video / Photo - Pressing this icon will switch your camera mode from photo (default) to video, if you want to record a video.
Front-Facing Camera - If your phone has a front-facing camera you can press this button to switch the viewfinder's video feed over to this. Press it again to switch the viewfinder back to the rear camera (default).
Flash mode - There are 3 flash modes; flash off, flash on and auto. What more can I say? Keep pressing this icon to switch to the mode you want.
Lenses - The icon that looks like a left and right arrow will bring up the lenses. These are mini-apps that add functionality to your camera in some way or another.
[tip]If you are seeing pictures that look perfectly sharp when you're focusing on a subject and after the picture is taken, everything seems to blur it's because Windows Phone saves a low-res preview of your image for you to zoom into and look around. It's low-res in order to keep the performance high, but unfortunately this means that you're seeing a lower quality, more blurred image than the picture you just took really is. If you want to view your photo in its true quality you can either view your pictures on a PC monitor or install the HD Photo Viewer app.[/tip]
Set your expectations
As I will go onto say in the following posts, you need to understand your camera's strengths and weaknesses in order to take a good picture with it. No matter what picture you want to take, if you are trying to take a picture that your phone's camera isn't suited to (one of it's weaknesses) you will not get a good picture from it. What this means is that it's absolutely essential that you know your camera's limitations and have them in mind when you're trying to take pictures.
Aperture and F-numbers?
I think we can all agree that photography is all about controlling light. I've done a lot of reading around this subject, as it seems people have unrealistic expectations of the capabilities of their phones and it's all directly tied to this.
What the heck is aperture? Isn't it a form of science?
Aperture is the diameter of the lens opening. Our phones have fixed apertures. On a bigger camera, there will be a mechanism that opens and closes. The larger the diameter of the aperture, the more light reaches the sensor.
Not to scale.
HTC 8x: f/2.0
HTC 8s: f/2.8
Nokia Lumia 1020: f/2.2
Nokia Lumia 928: f/2.0
Nokia Lumia 925: f/2.0
Nokia Lumia 920: f/2.0
Nokia Lumia 820: f/2.2
Nokia Lumia 720: f/1.9
Nokia Lumia 620: f/2.4
Nokia Lumia 520: f/2.4
So what does this mean for you? All of the current phones have an f-stop between 1.9 and 2.8. Generally speaking: the smaller the number the larger the hole. Remember that. A 'fast' lens is one that has a large maximum aperture - that means we can use our phones in a wider variety of situations. The larger the aperture, the better your camera will perform in low-light situations, since a larger lens opening will let more light in than a smaller lens opening. It also means that having a larger aperture will let you use a faster shutter speed to freeze action so your pictures will be sharper and better detailed.
Focal Length and Depth of Field
So my phone is built to let me take pictures in a wide variety of situations how will that affect the pictures I take? Let me introduce you to focal length and depth of field.
Focal length - This is the distance between the lens and the camera's sensor. For our phones the distance varies between 20-35mm. A phone like the 920, for example, has a focal length of 26mm. So what? Because the distance between the lens and the sensor are so short that means our phones camera's have a wide angle of view. The wide the angle of view the greater the area captured.
Because our phones have such large apertures (f1.9-2.8) this means that our phones are designed to handle subjects close-mid range really well. Any photographer will tell you that you need to have a smaller aperture of something like f/8.0 (remember: f/8.0 is a smaller hole than f2.0, meaning less light is let into the sensor) to be able to capture details further away, as you'd expect in your average landscape. This is why we can't reasonably expect our phones to take crystal clear images of objects on the horizon; with such a small fixed aperture they simply aren't designed to take pictures aimed at mid-far range.
To be clear, this is a universal issue, or 'weakness' if you will. The lens on any camera phone today, whether its the 920, 928, HTC One etc. will have small sensors and fixed-aperture lenses. This is because we demand to be able to point and click at a wide variety of subjects at all times of the day and your average user in their urban location is going to take pictures at close-mid range. If you want a camera that will take really amazing pictures both far and near you're going to want to buy a dedicated camera.
As you experiment with your camera and find out its strengths remember that this fixed aperture is both a strength and a weakness and it's honestly up to you, the photographer, to use it well to take stunning pictures.
If you want to find out more about Aperture and F-Stop and how it will affect the photos you want to take, check out any of the following links:
http://www.ethiriel.com/wordpress/archives/676
http://www.photoxels.com/digital-photography-tutorials/tutorial-aperture/
Focusing: Tap-to-focus vs. Shutter button
If you press the shutter button down half-way your camera will focus on whatever is in the centre of the frame. Once you hear the beep, confirming focus, press the shutter all the way down to capture the photo. If you want to focus on a specific area of the screen, you can tap on that part of the screen and you should see a focus 'box' appear around the area you tapped. Your phone will focus on that area instead of in the centre of the frame. This is particularly good when you have elements in both the foreground and background and you only want to focus on one of them. Arguably, your phone will take slightly sharper pictures if you tap the screen because there isn't so much movement from physically depressing a button, but on phones like the 920 series with Optical Image Stabilization this shouldn't matter so much.
Your Phone's Sensor
On our phone cameras we don't have a physical shutter that lets light in for a certain amount of time, so our sensor is 'powered up' for the amount of time the phone determines the sensor needs light to capture the picture. This could mean that an electrical current is passed through the sensor, allowing it to receive and process light, for as little as 1/250 of a second or even more. Our camera phones use something called a Back Side Illuminated Sensor (BSI), which you can read a bit more about by clicking here. When we're talking about sensors, bigger is definitely better. The bigger your sensor, the more transistors you can fit on your sensor and bigger transistors produce less noise and are better at gathering light in the same amount of time.
Okay, so how does this affect me? When your sensor is 'turned on' to capture light for that tenth of a second or less it's measuring the light of your scene, which is an analogue value, measured by individual transistors on the sensor. That value is then processed and turned to digital information. Our phones are really good at resolving this information when it comes to close-medium range information but look at something a little further away that's a flat colour like the sky and you'll notice a bit of noise, even taken at ISO 100. (Keep reading to find out exactly how noise and ISO works.) Now, this noise isn't ground-breaking, all camera's have a little bit of noise in some situations, and it certainly won't ruin your picture but you have to bear in mind the size of the sensor on your phone. I'm not saying your phone's camera is bad - far from it. I think phone cameras are amazing for the quality of the image they produce, but if you have expectations that you're going to be able to take pictures just as good, sharp and clear of mid-far distance objects, as mentioned above - you need to consider buying a dedicated camera.
SkyDrive Auto Upload
On Windows Phone a lot of people like to set-up their camera to automatically upload the pictures they just took to their SkyDrive account in the cloud - even more so now that we're able to upload full-resolution pictures from our phones. So how do you set your phone up to do this? Here's how:
Go to your Photo's Hub and tap the '...' at the bottom of the screen. A menu will appear, tap on the settings menu.
Near the bottom of the photos + camera settings you'll see 'Auto Upload' and SkyDrive. Tap on the word 'SkyDrive' and the following menu will appear:
Keep reading to find out some tips about how to approach the shot, and lots more!
Attachments
Last edited by a moderator:


")
 Twitter